
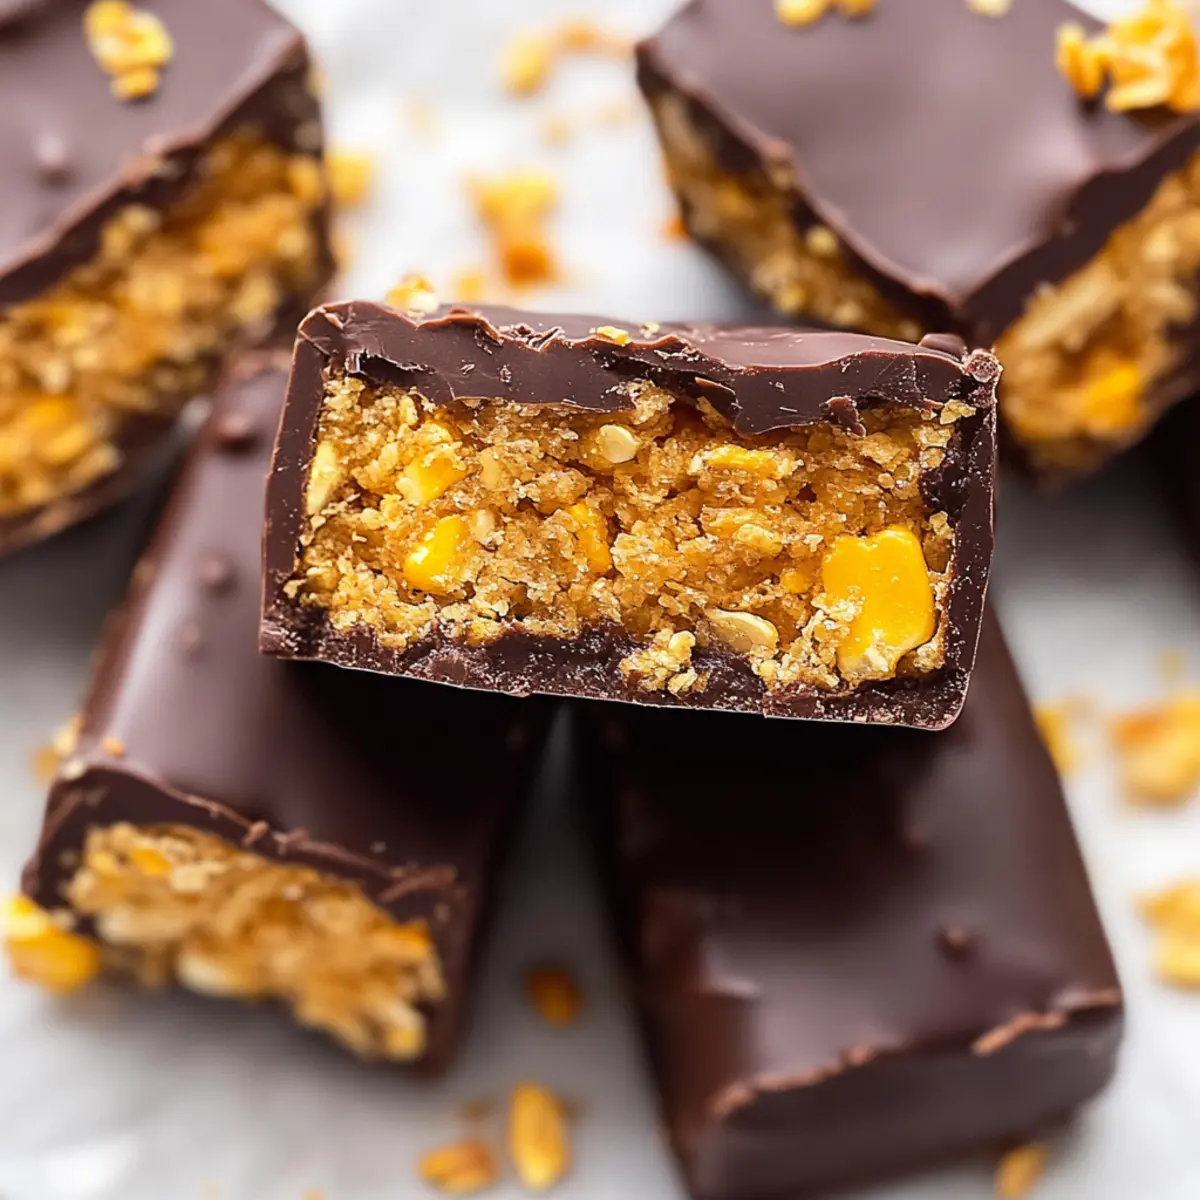
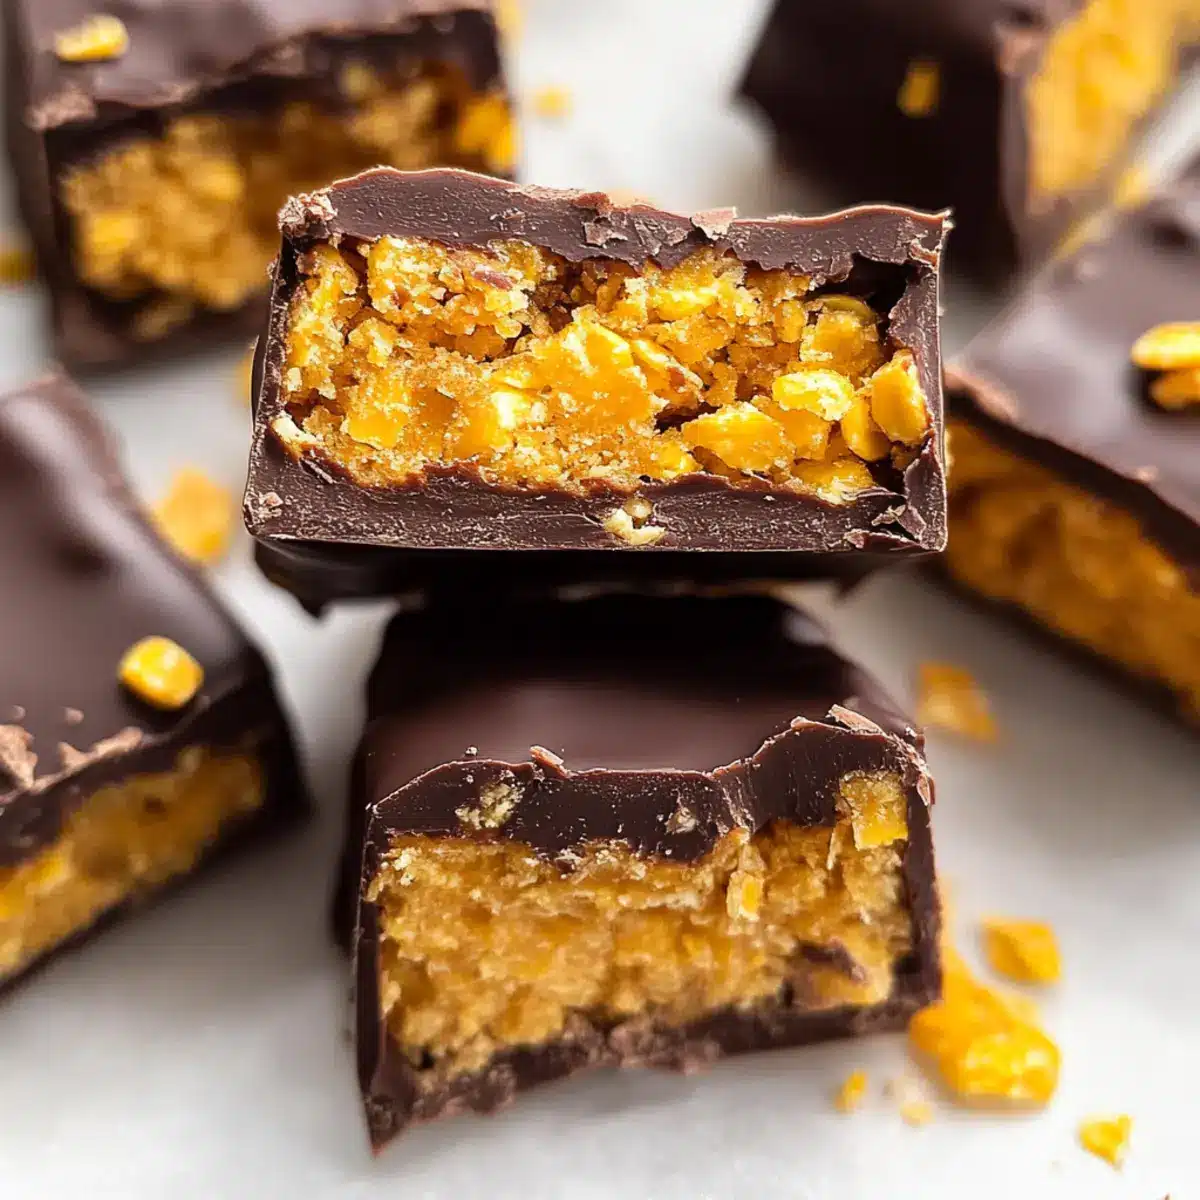
As I scoured the snack aisle one afternoon, I stumbled upon a forgotten treasure from my childhood—Butterfingers. Instantly, I was transported back to blissful days of crunchy, chocolate-covered goodness. But as I pondered the ingredients, I realized it was time for a healthier twist. Enter my Healthy Homemade Butterfingers! With just five simple ingredients, this recipe not only satisfies sweet cravings but also aligns with your dietary needs, being gluten-free and dairy-free. Perfect for a quick snack or an indulgent dessert, these delightful bars can be made ahead and stored in the freezer for those moments when you need a little pick-me-up. Curious about how easy it is to whip up this guilt-free treat? Let’s dive in!

Why choose homemade Butterfingers?
Healthier Alternative: These Healthy Homemade Butterfingers give you the delightful crunch without the guilt, crafted from simply five wholesome ingredients!
Quick and Easy: With just a few straightforward steps, you’ll have delicious bars ready to indulge in—perfect for busy weeknights!
Natural Sweetness: Sweetened with maple syrup or honey, you can enjoy a treat that won’t weigh you down.
Versatile Crunch: Feeling adventurous? Swap peanut butter for almond or add spices for extra flair!
Crowd Pleaser: Everyone loves a little nostalgia; these bars are sure to impress kids and adults alike at your next gathering!
For another delightful dessert idea, consider the delightful flavor of the German Bee Sting cake!
Healthy Homemade Butterfinger Ingredients
• Dive right into making your own guilt-free treats!
For the Bars
- Peanut Butter – This rich and creamy base brings that classic flavor!
- Maple Syrup or Honey – Choose either for a natural sweetness that binds everything together.
- Corn Flakes – It adds the perfect crunch and structure to your Healthy Homemade Butterfingers.
For the Chocolate Coating
- Chocolate Chips – Provides the sweet, decadent chocolate layer we all crave.
- Coconut Oil – Helps to smooth out the chocolate for an even, glossy finish.
Step‑by‑Step Instructions for Healthy Homemade Butterfingers
Step 1: Prepare Corn Flakes
Begin by placing your corn flakes into a zip-top bag. Use a rolling pin or your hands to crush them into small, bite-sized pieces, taking care not to pulverize them completely. Aim for a texture that maintains some crunch. This will provide the structure in your Healthy Homemade Butterfingers, so take your time for even results.
Step 2: Mix Ingredients
In a large mixing bowl, combine the creamy peanut butter and your choice of maple syrup or honey. Using a spatula, mix them together until you achieve a smooth, homogenous consistency. Once smooth, gently fold in the crushed corn flakes, ensuring they are evenly coated with the peanut butter mixture, which binds everything together into a cohesive blend.
Step 3: Set Mixture
Line a loaf pan with parchment paper for easy removal later. Transfer the corn flake mixture into the prepared pan, pressing it down firmly with another spatula or your hands to create a level layer. This compacted mixture is essential for forming sturdy bars. Place the pan into the freezer for a minimum of one hour, allowing it to harden.
Step 4: Slice Bars
After an hour in the freezer, remove the pan and carefully lift out the hardened mixture using the parchment paper. Place it onto a cutting board and slice it into 12 equal bars with a sharp knife. These will be your Healthy Homemade Butterfingers, ready to be coated in chocolate!
Step 5: Melt Chocolate
In a small microwave-safe bowl, combine chocolate chips and coconut oil. Microwave in 15-second intervals, stirring each time, until completely melted and smooth. The coconut oil gives the chocolate a lovely sheen and helps it coat the bars evenly. Aim for a runny consistency that is perfect for dipping.
Step 6: Coat Bars
Take each bar and dip it into the melted chocolate, ensuring that all sides are coated. Allow any excess chocolate to drip off before placing the bars on a parchment-lined plate. This step will give your Healthy Homemade Butterfingers that decadent chocolate layer we adore, so be thorough!
Step 7: Final Freeze
Once all bars are coated, return them to the freezer for about 10 minutes to allow the chocolate to set. The chocolate should harden around each bar, creating a deliciously crunchy exterior. After this quick freeze, your bars are ready to enjoy or store for later in an airtight container in the freezer!
Make Ahead Options
These Healthy Homemade Butterfingers are perfect for meal prep, allowing you to enjoy delicious treats whenever cravings strike! You can prepare the bars up to 3 days in advance by following the initial steps: mix the peanut butter, sweetener, and crushed corn flakes, then press the mixture into the loaf pan. After freezing for an hour, slice into bars and store them in an airtight container in the freezer. When you’re ready to serve, simply melt the chocolate and coconut oil, coat the bars, and freeze again for about 10 minutes. This way, you’ll have fresh-tasting, crispy chocolate-covered goodness waiting for you, just as delightful as when they were first made!
Healthy Homemade Butterfingers Variations
Feel free to unleash your creativity and customize these Healthy Homemade Butterfingers to fit your taste buds perfectly!
-
Nut Variety: Try cashew or sunbutter if you’re looking for a different nutty flavor. It adds a unique twist!
-
Sweetness Level: Adjust the sweetness by using less maple syrup or honey, or try adding a sprinkle of stevia for a sugar-free alternative.
-
Add Spices: Experiment with spices like cinnamon or vanilla extract for an extra layer of flavor. It enhances the overall taste profile beautifully!
-
Dairy-Free Chocolate: Opt for dairy-free chocolate chips for a fully dairy-free version. These bars will still be decadently chocolatey!
-
Crunchy Texture: Swap corn flakes for crispy brown rice or even granola for added nutrients and a different texture. This can elevate each bite!
-
Mini Bars: Cut the bars into smaller bite-sized pieces for a fun snack that’s perfect for parties or lunches. They’re just as delightful but in a more manageable size!
-
Toasted Nuts: Toss in some chopped toasted nuts for added crunch and depth. The warmth of toasted nuts brings a wonderful aroma to the mix.
-
Heat Things Up: Add a dash of cayenne pepper to the melted chocolate for a spicy kick. It’s an unexpected but delightful contrast to the sweetness!
For even more delicious homemade treats, check out the delightful sweetness of German Bee Sting cake for your next dessert inspiration!
Expert Tips for Healthy Homemade Butterfingers
-
Choose Creamy Peanut Butter: For the best consistency, a creamy peanut butter will blend seamlessly with the other ingredients, ensuring that your Healthy Homemade Butterfingers hold together beautifully.
-
Crushing Corn Flakes: Opt for a size that retains some crunch; too finely crushed will result in a less delightful texture. Experiment to find your perfect balance!
-
Quick Chocolate Dipping: When coating the bars, work quickly with the melted chocolate to avoid your mixture softening. If it starts to soften, just refreeze for a few minutes!
-
Storage Secrets: Store your bars in an airtight container in the freezer; they’ll keep fresh for up to three months! A little time savoring your snacks can go a long way.
-
Improve Chocolate Melting: Stir frequently while melting chocolate with coconut oil to avoid burning; a smooth texture ensures a lovely coating for your Healthy Homemade Butterfingers!
What to Serve with Healthy Homemade Butterfingers?
Creating the ultimate indulgent experience is easy when you pair these crispy, chocolatey treats with tasty companions.
-
Creamy Almond Milk: A smooth, nutty drink that complements the rich chocolate and peanut flavor, making each bite even more delightful.
-
Fresh Fruit Salad: Bright, seasonal fruits like berries and melons add a refreshing contrast to the sweetness, balancing each bite beautifully.
-
Decadent Coffee: A warm cup of coffee, especially with a hint of vanilla, enriches the chocolate and adds a lovely depth to your dessert experience.
-
Gourmet Dark Chocolate: Enhance your chocolate cravings with high-quality dark chocolate; it’ll elevate the sweetness and add a luxurious touch.
-
Homemade Whipped Coconut Cream: Light and airy, this adds a creamy texture that complements the crunchiness of your Healthy Homemade Butterfingers, making each bite divine.
-
Nutty Granola: Add a handful alongside your bars for a crunchy contrast—an exciting texture that enhances both your dessert and snack time!
How to Store and Freeze Healthy Homemade Butterfingers
Airtight Container: Store your Healthy Homemade Butterfingers in an airtight container in the freezer to maintain their crunchy texture and avoid freezer burn, lasting up to 3 months.
Individual Wrapping: For easy snacking, individually wrap each bar in parchment paper before placing them in the container; this allows for grab-and-go convenience whenever cravings hit!
Thawing Instructions: Simply allow the bars to sit at room temperature for about 10-15 minutes before indulging to enjoy the perfect balance of chilly chocolate and delightful crunch.
Reheating Tip: If you’d like to soften the bars slightly without losing their structure, you can microwave them for about 5-10 seconds—just enough to warm them up!
Healthy Homemade Butterfingers Recipe FAQs
What type of peanut butter should I use?
Absolutely! For the best texture and flavor in your Healthy Homemade Butterfingers, use creamy peanut butter. This will ensure a smooth consistency that blends well with the other ingredients, helping your bars hold together nicely. Natural or organic brands without added sugar or stabilizers will work wonderfully, making them even healthier!
How should I store my Healthy Homemade Butterfingers?
You’ll want to keep your delicious bars in an airtight container in the freezer to maintain their fresh crunch. They can last for up to 3 months this way! If you’d like quick access to your treat, consider individually wrapping each bar in parchment paper before placing them in the container for easy grab-and-go snacking.
Can I freeze Healthy Homemade Butterfingers?
Very much so! To freeze your Healthy Homemade Butterfingers, simply place them in an airtight container after the chocolate has set. Make sure they’re separated to prevent sticking, which can be achieved by using parchment paper between layers. They will stay fresh in the freezer for about 3 months. When you’re ready to enjoy, let them thaw at room temperature for about 10-15 minutes.
How do I troubleshoot if my chocolate coating is not smooth?
If your chocolate isn’t melting smoothly, it could be due to a couple of factors. Firstly, make sure to stir the mixture every 15 seconds while microwaving. This helps distribute the heat evenly. If it starts to seize, add a teaspoon of coconut oil and stir vigorously until it smooths out. For a deliciously glossy finish, never let the chocolate get too hot—aim for a warm, pouring consistency instead!
Are there any allergy considerations for this recipe?
Certainly! While this recipe is naturally gluten-free and dairy-free, always check your ingredient labels to ensure they meet your specific dietary needs. For peanut allergies, you can substitute peanut butter with almond or sunflower seed butter—both work great! Also, be cautious with chocolate chips, as some brands may contain allergens, so look for allergen-free options when needed.
What if my mixture is too soft after mixing?
If you find that the mixture is too soft to hold its shape, don’t worry! It likely needs more time in the freezer to firm up. Place the mixture back into the freezer for an additional 15-30 minutes and then try shaping it again. If this continues to be an issue, consider adding a bit more crushed corn flakes to add structure without affecting the flavor too much!

Healthy Homemade Butterfingers You Can Guiltlessly Indulge In
Ingredients
Equipment
Method
- Prepare Corn Flakes: Place corn flakes in a zip-top bag and crush into small pieces.
- Mix Ingredients: In a bowl, combine peanut butter and maple syrup or honey, then fold in crushed corn flakes.
- Set Mixture: Line a loaf pan with parchment paper and press the corn flake mixture into the pan.
- Slice Bars: After freezing, lift the mixture from the pan and slice into 12 equal bars.
- Melt Chocolate: Combine chocolate chips and coconut oil in a bowl and microwave until melted.
- Coat Bars: Dip each bar in melted chocolate and place on parchment-lined plate.
- Final Freeze: Place coated bars back in the freezer for 10 minutes to set.
Leave a Reply