
The aroma of seasoned chicken sizzling on the stove instantly transports me to my favorite family gatherings, where laughter and love filled the air. Today, I’m excited to share my recipe for Crunchy Oven-Baked Chicken Taquitos—an effortless dish that transforms simple ingredients into crispy, cheesy delights that everyone will adore. This beginner-friendly recipe packs a punch with its vibrant flavors and textures, making it a perfect meal prep option for busy weeknights. Not only does it deliver on ease and satisfaction, but it’s also a crowd-pleaser that can be tailored for gluten-free diets with just a quick swap of tortillas. Are you ready to elevate your snack game and whip up a delicious batch? Let’s dive in!
Why Are These Taquitos So Irresistible?
Beginner-Friendly: No chef skills required! This recipe is designed for everyone, making it easy for you to impress friends and family.
Flavor Explosion: A harmonious mix of creamy cheeses, zesty spices, and tender chicken creates an irresistible filling that bursts with flavor.
Crowd-Pleaser: Perfect for game nights or casual gatherings; these crunchy treats will have your guests coming back for more.
Meal Prep Marvel: With just 15 minutes of prep, you can whip these up in advance, making weeknight dinners effortless.
Gluten-Free Option: Swap out flour tortillas for corn ones, ensuring everyone can enjoy this delightful snack.
Perfectly Crispy: Baking gives you that satisfying crunch without the guilt of frying—deliciously healthy and totally satisfying!
Enjoy these taquitos alongside your favorite dips; pair them with some Cajun Chicken Pasta for a delightful feast!
Crunchy Oven-Baked Chicken Taquitos Ingredients
Here’s everything you need to create these irresistible treats.
For the Filling
• Cooked, Shredded Chicken Breast – Provides lean protein and a tender base for the filling; rotisserie chicken works great for a quick option.
• Shredded Cheddar Cheese – Adds a sharp, tangy kick and helps bind the filling together as it melts.
• Shredded Mozzarella Cheese – Delivers a stretchy, gooey texture that complements the cheddar’s bite.
• Cream Cheese (4 oz) – Adds luxurious smoothness to the filling, ensuring a cohesive mixture.
• Sour Cream (1/4 cup) – Contributes bright tang and helps balance the rich cheeses.
• Salsa (1/4 cup) – Provides moisture and zesty flavor that enhances the overall taste.
• Garlic Powder (1 tsp) – Imparts savory depth to the mixture without added moisture.
• Onion Powder (1 tsp) – Adds gentle sweetness and aromatic warmth to the filling.
• Cumin (1 tsp) – Lends an earthy, slightly nutty note to the mixture.
• Chili Powder (1 tsp) – Offers a mild heat and smoky hint that elevates the flavors.
• Salt and Black Pepper – Essential seasonings that balance everything perfectly.
For the Taquitos
• Small Flour Tortillas (10-12) – Acts as the crunchy vessel for the filling; swap for corn tortillas for a gluten-free option.
• Cooking Spray or Vegetable Oil – Ensures a crispy finish upon baking for that delightful crunch.
Get ready to savor every bite of these crunchy oven-baked chicken taquitos!
Step‑by‑Step Instructions for Crunchy Oven-Baked Chicken Taquitos
Step 1: Preheat the Oven
Begin by preheating your oven to 425°F (220°C). While the oven is heating, prepare a baking sheet by lining it with parchment paper or lightly greasing it with cooking spray. This will ensure your Crunchy Oven-Baked Chicken Taquitos come out perfectly crispy without sticking.
Step 2: Prepare the Filling
In a large mixing bowl, combine the cooked, shredded chicken with shredded cheddar, mozzarella, cream cheese, sour cream, and salsa. Stir well until all ingredients are thoroughly blended, allowing the creamy texture to envelop the chicken. The mixture should appear uniform and ready to satisfy your taste buds.
Step 3: Season the Mixture
Next, add garlic powder, onion powder, cumin, chili powder, salt, and black pepper to the bowl. Mix everything together until the spices are evenly distributed throughout the filling. The blend of flavors will enhance your Crunchy Oven-Baked Chicken Taquitos, making them enticing and flavorful.
Step 4: Fill the Tortillas
Lay a small flour tortilla on a flat surface and spoon 2-3 tablespoons of the filling along one edge. With your fingers, gently roll the tortilla over the filling, keeping it tight while you wrap. Continue rolling until the taquito is completely wrapped, securing the filling inside for a delightful bite.
Step 5: Arrange on Baking Sheet
Place each rolled taquito seam-side down on the prepared baking sheet, ensuring there’s space between each one. This will allow for even cooking and crispiness. As you arrange your Crunchy Oven-Baked Chicken Taquitos, take pride in their neat presentation, knowing they’ll look delightful when served.
Step 6: Oil for Crispiness
Lightly brush or spray the tops of the taquitos with cooking oil. This important step helps achieve that golden-brown crispiness you desire. Make sure to cover each taquito with a thin layer of oil, ensuring they bake evenly and enhance the crunch factor.
Step 7: Bake to Perfection
Place the baking sheet in the preheated oven and bake for 15-20 minutes. Keep an eye on them as they cook, looking for a beautiful golden-brown color and a crispy texture. The aroma will fill your kitchen, letting you know these Crunchy Oven-Baked Chicken Taquitos are about to be ready.
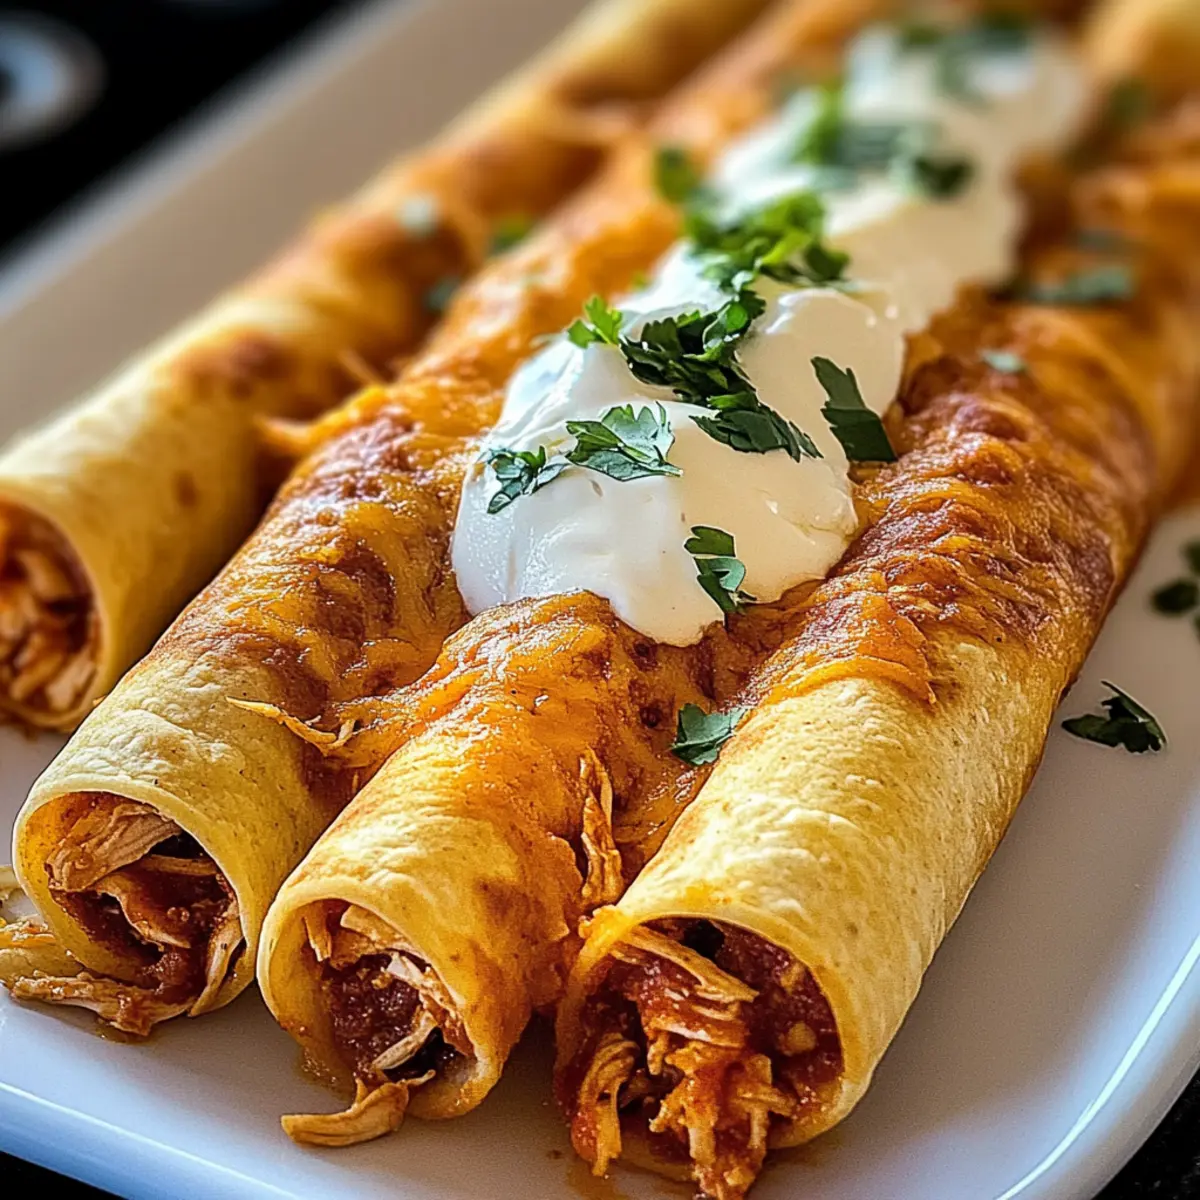
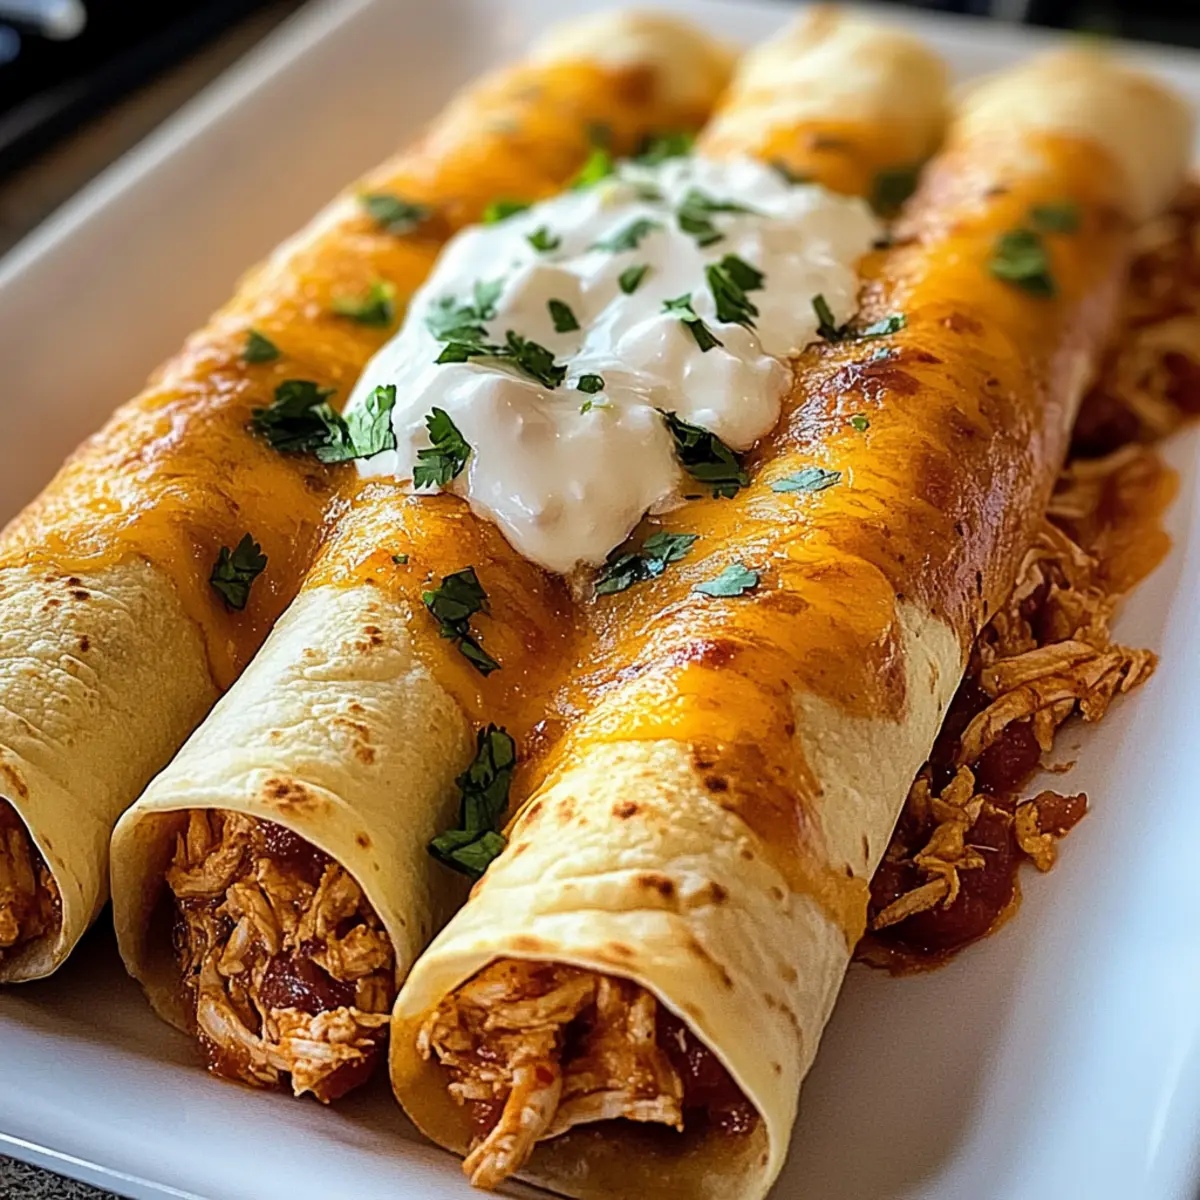
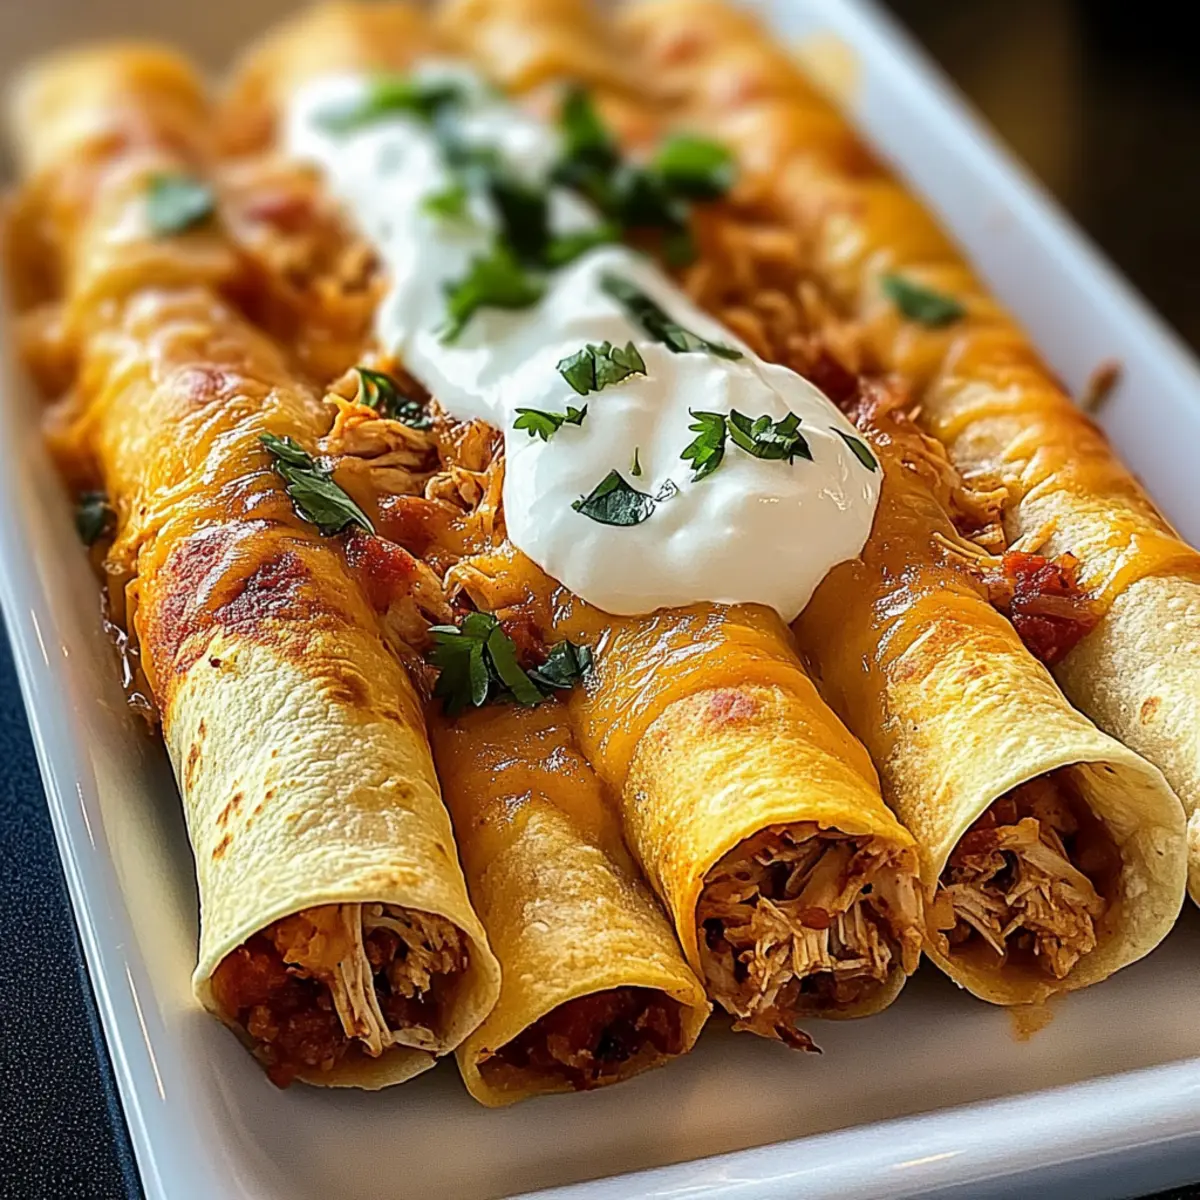
Step 8: Cool and Serve
Once baked, remove the taquitos from the oven and allow them to cool for a few minutes. This will help them hold their shape when served. Pair them with your favorite salsa or guacamole for dipping, and enjoy the satisfying crunch and delicious flavor with every bite.
Expert Tips for Crunchy Oven-Baked Chicken Taquitos
- Rolling Technique: Ensure the taquitos are rolled tightly to prevent unrolling during baking, achieving that perfect crispy finish everyone loves.
- Oil Application: Brush or spray lightly with oil for optimal crispiness; too much can make them soggy instead of crunchy.
- Batch Spacing: Arrange taquitos with space in between on the baking sheet to promote even cooking and prevent sticking.
- Ingredient Substitutions: Play around with cheese and spice levels to cater to your preferences while keeping the essence of the Crunchy Oven-Baked Chicken Taquitos intact.
- Freezing Tips: If making ahead, freeze unbaked taquitos, they can be baked from frozen—add a few extra minutes to the cooking time for best results.
Make Ahead Options
These Crunchy Oven-Baked Chicken Taquitos are a fantastic meal prep option that can simplify your busy weeknights! You can assemble the taquitos without baking them and refrigerate for up to 24 hours, ensuring busy evenings are hassle-free. Alternatively, prepare them for the freezer by placing the unbaked taquitos in a single layer on a baking sheet, then transfer to an airtight container after freezing for up to 3 months. To maintain quality, lightly brush them with oil before freezing to help keep that crispy texture intact. When you’re ready to enjoy, bake the refrigerated taquitos directly from the fridge for 20-25 minutes or from frozen for 25-30 minutes, delighting in a delicious homemade snack with minimal effort!
How to Store and Freeze Crunchy Oven-Baked Chicken Taquitos
Fridge: Keep leftover taquitos in an airtight container for up to 3-4 days to maintain their delicious flavor and texture.
Freezer: For longer storage, freeze unbaked taquitos by wrapping them tightly in plastic wrap and aluminum foil. They’ll stay fresh for up to 3 months.
Reheating: When ready to enjoy, reheat baked taquitos in the oven at 350°F (175°C) for 10-15 minutes until crispy. If reheating frozen taquitos, add an additional 5-10 minutes to ensure they’re thoroughly heated.
Make-Ahead Tip: Assemble your crunchy oven-baked chicken taquitos and refrigerate without baking for up to 24 hours. Just pop them in the oven when you’re ready for a tasty meal!
Crunchy Oven-Baked Chicken Taquitos Variations
Feel free to explore these delightful twists and substitutions to create your perfect taquito experience!
-
Spicy Twist: Swap cheddar and mozzarella with pepper jack cheese for an extra kick of heat. Perfect for those who enjoy a zesty surprise!
-
Vegetarian Delight: Use black beans or sautéed vegetables instead of chicken for a satisfying vegetarian option. Rich in flavor, these fillings are sure to delight even the staunchest meat lovers.
-
Cheese Medley: Experiment with a blend of your favorite cheeses such as Monterey Jack, Gouda, or even feta cheese to add a unique flavor profile to your filling.
-
Salsa Varieties: Try different salsas—mango salsa for a sweet twist or a spicy habanero salsa for those who crave heat. Each variation can transform your taquitos into an entirely new dish!
-
Herbs & Spices Boost: Add fresh herbs like cilantro or chopped green onions to the filling for an aromatic lift. The freshness will elevate the flavors beautifully!
-
Crunchy Coating: Before baking, roll taquitos in crushed tortilla chips for added crunch. This will create an extra crispy layer that makes each bite even more satisfying.
-
Sweet Surprise: Incorporate a hint of sweetness with diced roasted sweet potatoes or corn in the filling—this unexpected touch pairs wonderfully with the savory flavors.
-
Gluten-Free Option: Opt for corn tortillas instead of flour ones to make your crunchy oven-baked chicken taquitos gluten-free. Now everyone can join in on the fun!
With these variations, you can turn your family favorite into a new experience time and again! For more delicious chicken creations, check out my Garlic Parmesan Chicken or venture into a flavorful dish like Chicken Teriyaki Noodles. Enjoy customizing your taquitos!
What to Serve with Crunchy Oven-Baked Chicken Taquitos
Elevate your meal experience with these deliciously crunchy delights paired with vibrant sides and refreshing drinks.
-
Creamy Guacamole: A rich and creamy dip that complements the crunchy texture, adding a burst of fresh avocado flavor.
-
Zesty Salsa: A must-have with taquitos, its tangy and spicy notes enhance every bite, making each morsel even more irresistible.
-
Mexican Rice: Fluffy, seasoned rice provides a wonderful base or side, with flavors that harmonize beautifully with the savory filling.
-
Refried Beans: Smooth and hearty, these beans add protein and a creamy element to balance the crunchiness of the taquitos—comfort food at its best!
-
Fresh Cilantro Lime Salad: A vibrant salad with a punch of citrus that brightens up the meal, making it fresh and lively.
-
Crispy Tortilla Chips: Perfect for scooping up salsa or guacamole, they offer an extra crunch alongside your taquitos.
-
Refreshing Lemonade or Horchata: These drinks provide a cooling and refreshing contrast to the flavors and textures of the taquitos.
-
Seasoned Corn on the Cob: Sweet and juicy, this side adds a fresh burst of flavor, matching the essence of your tasty taquitos.
Crunchy Oven-Baked Chicken Taquitos Recipe FAQs
What’s the best way to select ripe ingredients for my taquitos?
Absolutely! For the best taste, choose fresh, ripe ingredients. For the salsa, opt for vibrant tomatoes without dark spots. If you’re using tortillas, look for flexible, soft ones that won’t crack when rolling. For the cheese, select blocks of cheddar and mozzarella instead of pre-shredded varieties; they’ll melt better and enhance flavor!
How should I store leftover taquitos and how long will they last?
Leftover Crunchy Oven-Baked Chicken Taquitos can be stored in an airtight container in the refrigerator for up to 3-4 days. Just make sure they have cooled completely before sealing to retain their crunch. When you’re ready to enjoy, reheat them at 350°F (175°C) for about 10-15 minutes to restore that crispy goodness!
Can I freeze my taquitos, and what’s the best method?
Yes, you can! To freeze your taquitos, first assemble them without baking. Wrap each one tightly in plastic wrap, followed by aluminum foil to protect against freezer burn. They can be stored like this for up to 3 months. When you’re ready to bake, simply remove the wrapping and bake straight from the freezer, adding an extra 5-10 minutes to the cooking time.
What should I do if my taquitos unroll while baking?
Rolling tightly is key! If they do unroll, try securing them with a toothpick before baking, which can help keep them intact. Alternatively, you can also bake them seam-side down, which often keeps the filling snug inside. If all else fails, it gives you an opportunity to enjoy your creation in a deconstructed way—still delicious!
Are there any dietary considerations I should be aware of?
Great question! If anyone requires a gluten-free option, swap out the flour tortillas for corn tortillas, ensuring a delightful and safe meal for them. Additionally, if you’re catering to individuals with lactose intolerance, you can use lactose-free cream cheese and choose dairy-free cheese alternatives for the filling.
Can I prepare the filling ahead of time?
Definitely! You can prepare the taquito filling a day ahead and store it in the fridge in an airtight container. This not only saves time but also allows the flavors to meld beautifully. Just fill your tortillas and bake when you’re ready for a quick and satisfying meal!

Deliciously Crunchy Oven-Baked Chicken Taquitos
Ingredients
Equipment
Method
- Preheat your oven to 425°F (220°C) and prepare a baking sheet.
- In a large mixing bowl, combine chicken, cheeses, cream cheese, sour cream, and salsa.
- Add garlic powder, onion powder, cumin, chili powder, salt, and pepper, then mix until blended.
- Lay a tortilla flat and spoon 2-3 tablespoons of filling along one edge. Roll tightly.
- Place taquitos seam-side down on the baking sheet, spaced apart.
- Lightly brush tops of taquitos with oil for crispiness.
- Bake for 15-20 minutes, until golden brown and crispy.
- Once baked, allow to cool for a few minutes before serving with salsa or guacamole.
Leave a Reply