
As I stood in my kitchen, the aroma of perfectly cooked rice mingling with hints of tangy vinegar and fresh seafood wafted through the air, it hit me—this is how comfort food should feel. Introducing my Easy Deconstructed Salmon Sushi Bake, a brilliant twist on traditional sushi that transforms beloved flavors into a cozy casserole perfect for sharing. This dish is not only family-friendly but also completely customizable; whether you prefer salmon, tuna, or shrimp, you can tailor it to fit your taste! The layers of seasoned sushi rice and a creamy seafood mix create a delightful contrast that will sweep your dinner guests off their feet. Plus, it’s quick to whip up, making it an ideal choice for bustling weeknights or fun get-togethers. Ready to dive into a dish that’s as satisfying as it is delicious? Let’s get started!
Why is this recipe a crowd-pleaser?
Versatile and Customizable: This Salmon Sushi Bake easily adapts to your preferences, whether you’re using salmon, tuna, or shrimp. Simplicity in Preparation: With minimal cooking skills required, anyone can whip this up quickly. Comforting Layers: Experience the delightful contrast of seasoned sushi rice and creamy seafood mix. Perfect for Sharing: Serve at family dinners or gatherings, and watch it disappear! For more delicious ideas, don’t miss out on my Baked Beef Tacos and Bake Nutella Cheesecake for ultimate crowd appeal!
Salmon Sushi Bake Ingredients
Gather all the essentials to create this scrumptious Salmon Sushi Bake that the whole family will love!
For the Rice Base
- Sushi Rice – Gives the dish its signature texture; use short-grain for best results.
- Rice Vinegar – Essential for that authentic sushi flavor; don’t skip it!
- Sugar – Balances the acidity of the vinegar for a harmonious taste.
- Salt – Enhances the overall flavor of the dish.
For the Seafood Mix
- Salmon – The star ingredient; rich and buttery. Feel free to substitute with tuna or shrimp.
- Imitation Crab – Adds extra seafood flavor; omit it or use more salmon if you prefer.
For the Creamy Sauce
- Sriracha Mayo – Brings creaminess and a kick of heat; for a milder option, mix Kewpie Mayo with Sriracha.
For the Topping
- Furikake – A must-have seasoning that adds umami; don’t skip this!
- Sesame Seeds – Optional, for added crunch and visual flair.
- Green Onions – Freshness and color that brighten the dish.
Each layer of this Salmon Sushi Bake combines to create a delicious and comforting meal experience that’s sure to win hearts!
Step‑by‑Step Instructions for Salmon Sushi Bake
Step 1: Cook Sushi Rice
Begin by rinsing 2 cups of sushi rice under cold water until the water runs clear. Cook the rice according to the package instructions, typically using a rice cooker or on the stovetop. Once the rice is tender and sticky, remove it from heat and let it sit covered for 10 minutes to steam, ensuring you achieve that perfect sushi rice texture.
Step 2: Prepare Rice Seasoning
In a microwave-safe bowl, combine 1/4 cup rice vinegar, 2 tablespoons sugar, and 1 teaspoon salt. Microwave the mixture for about 30 seconds or until the sugar dissolves completely. Gently fold this seasoned mixture into the warm sushi rice, ensuring the rice is evenly coated and sticky. Set the seasoned rice aside to cool while you prepare the seafood mix.
Step 3: Cook the Salmon
Preheat your oven to 375°F. Season 1 pound of salmon with salt and pepper, then place it on a baking sheet lined with parchment paper. Bake the salmon for 15-17 minutes, or until it flakes easily with a fork. Alternatively, you can use an air fryer at 400°F for about 10-12 minutes. Once cooked, let it cool slightly, then flake the salmon into bite-sized pieces.
Step 4: Mix Seafood Ingredients
In a large mixing bowl, combine the cooked and flaked salmon with 8 ounces of imitation crab, shredding the crab into smaller pieces. As you mix, use a fork to break the salmon into smaller chunks for an even consistency. This combination forms the delicious seafood base for your Salmon Sushi Bake.
Step 5: Create Creamy Sauce
Stir in 1/3 cup of Sriracha mayo into the seafood mixture until everything is well combined. The creamy sauce adds rich flavor and a touch of spice to your Salmon Sushi Bake. Ensure that every piece of seafood is coated for that perfect flavor burst with each bite. Set this mixture aside while you prepare the baking dish.
Step 6: Assemble the Bake
Preheat your oven to 400°F. Grease a 9×13-inch baking dish and press your seasoned sushi rice into an even layer at the bottom. Sprinkle 1 tablespoon of furikake seasoning evenly over the rice, adding an umami kick. Next, layer the seafood mixture on top, spreading it evenly and making sure every corner is filled with this delightful concoction.
Step 7: Bake the Dish
Place the assembled Salmon Sushi Bake in the preheated oven and bake for 10-15 minutes, or until the top is slightly golden and bubbly. Keep an eye on it to prevent over-browning, ensuring that the dish retains its warm and creamy goodness. This step is crucial for developing the flavors and textures that make this dish so comforting.
Step 8: Add Final Touches
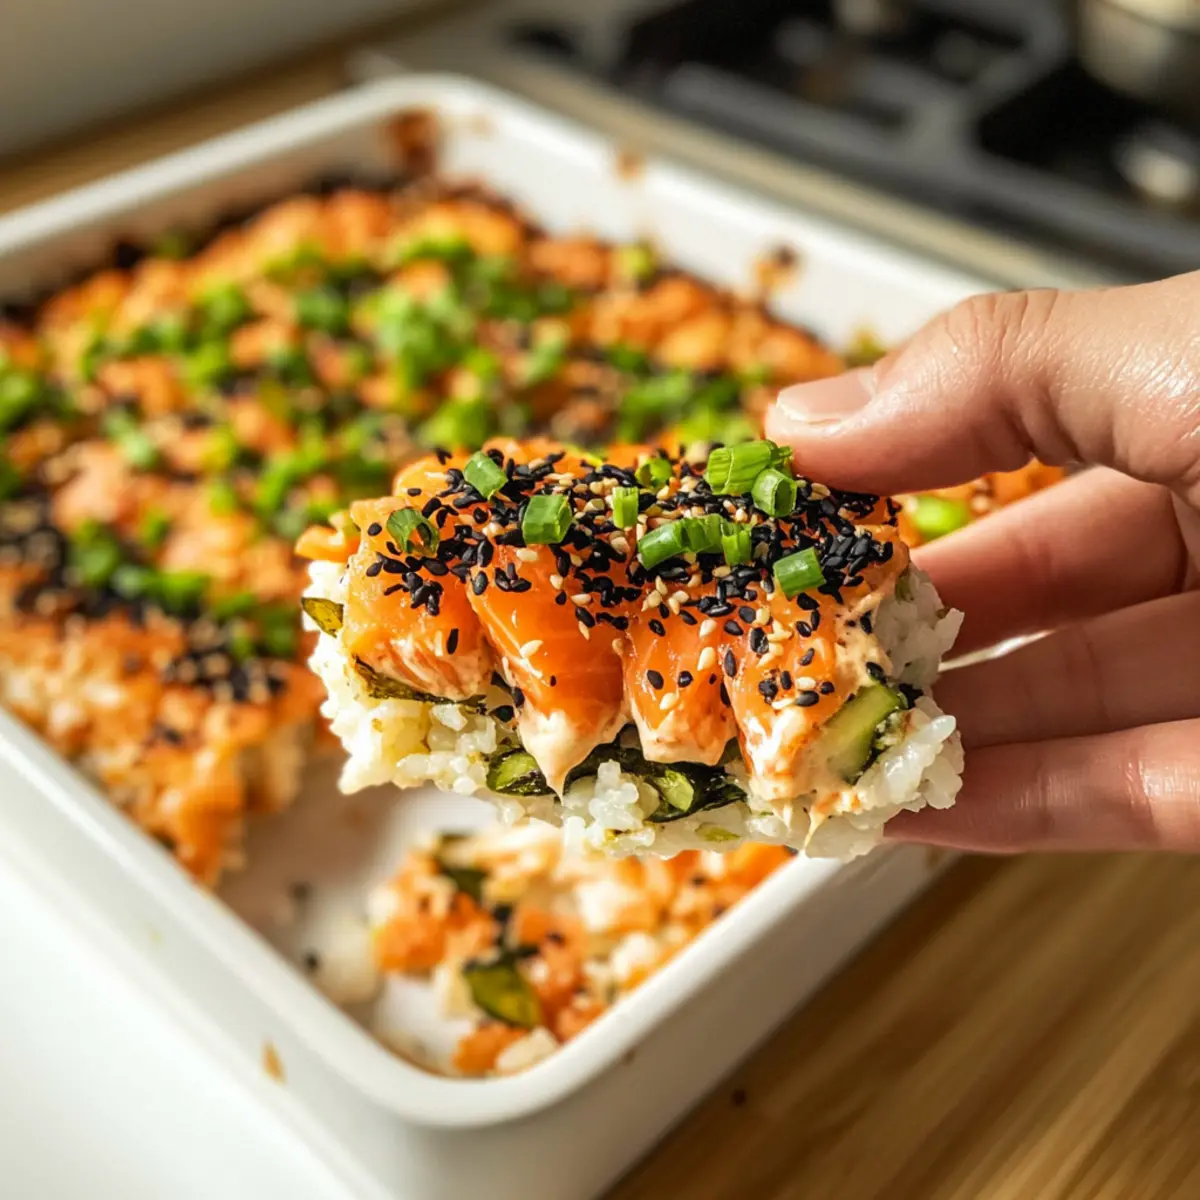
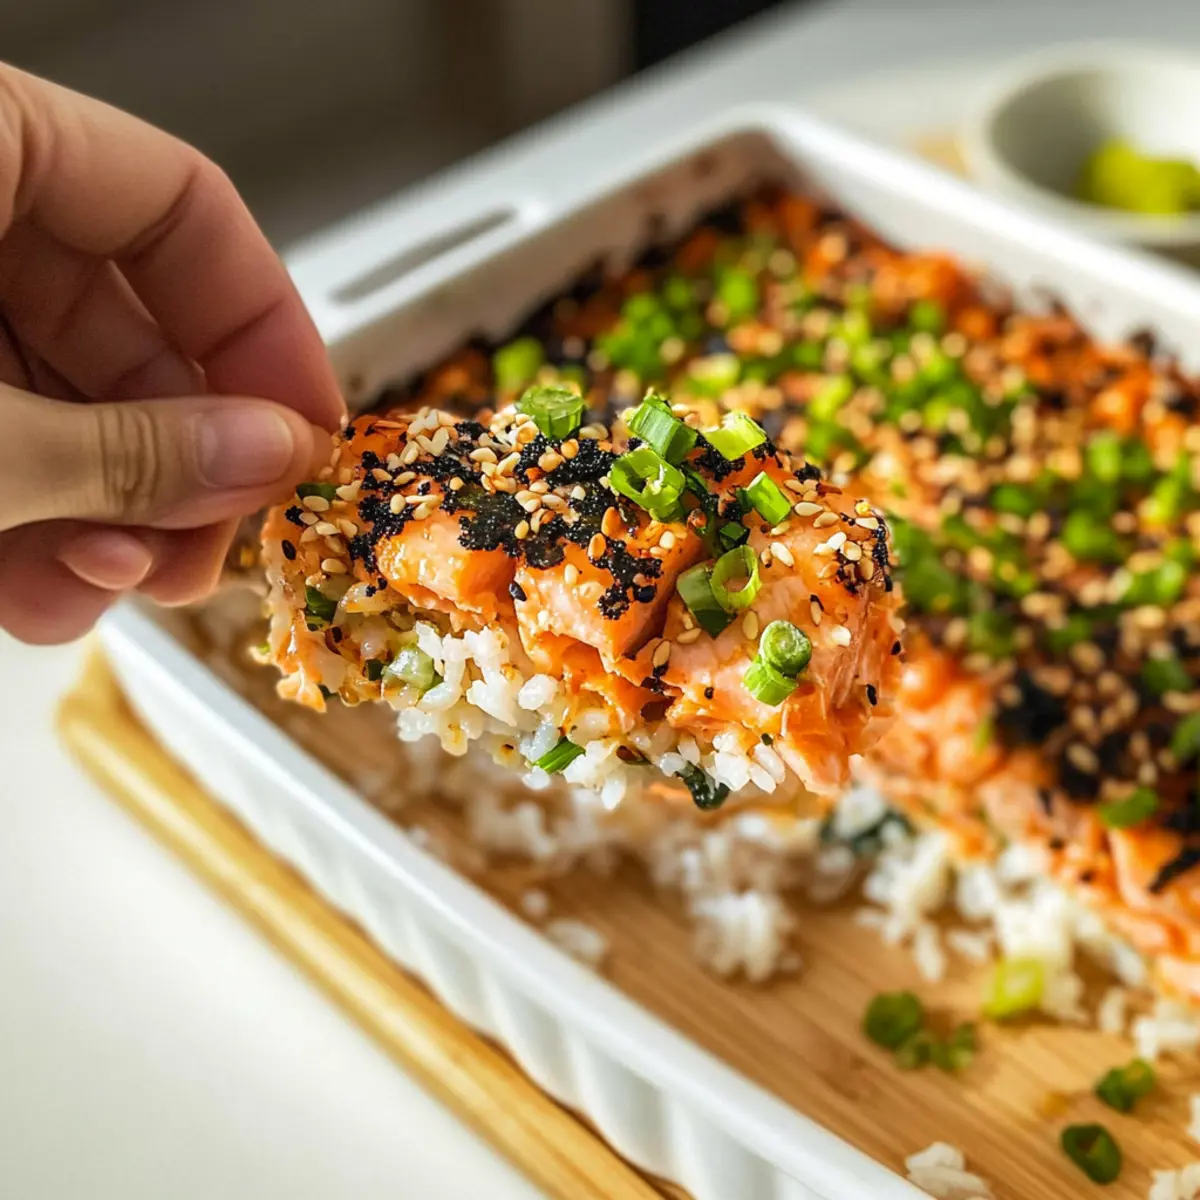
Once baked, remove the dish from the oven and allow it to cool for a few minutes. Drizzle additional Sriracha mayo on top for extra flavor, then sprinkle with more furikake, sesame seeds, and sliced green onions for color and crunch. These finishing touches will elevate your Salmon Sushi Bake, making it even more appealing to the eye.
Step 9: Serve Warm
Slice and serve your delightful Salmon Sushi Bake warm, optionally pairing it with seaweed snacks for a true sushi experience. Each bite offers comforting layers and bold flavors that are sure to impress your family and friends. This dish is perfect for sharing and will bring a smile to everyone’s face!
Salmon Sushi Bake Variations
Feel free to get creative with your Salmon Sushi Bake and make it your own! These delightful twists will inspire your culinary creativity and cater to your family’s tastes.
- Tuna Twist: Substitute salmon with canned or seared tuna for a lighter, equally delicious option.
- Shrimp Delight: Replace the salmon with fresh shrimp, giving it a sweet and succulent flavor.
- Dairy-Free: Use avocado or a dairy-free cream option in place of Sriracha mayo for a lighter touch.
- Add Fresh Crunch: Toss in diced cucumber or avocado for a refreshing crunch that brightens each bite.
- Spicy Kick: For an extra heat boost, fold in diced jalapeños or a few drops of chili oil into the seafood mix.
- Creamy Smoothness: Swap out the imitation crab with cream cheese for creamy richness that adds depth and texture.
- Flavorful Herbs: Experiment by adding fresh herbs like cilantro or basil to the seafood mix for a fragrant twist.
These variations not only keep things exciting but also allow you to use what you have on hand. And if you’re in the mood for more delicious casseroles, don’t miss my Bake Chocolate Oatmeal for a sweet treat that’s worth sharing!
Make Ahead Options
Preparing the Easy Deconstructed Salmon Sushi Bake ahead of time is a fantastic way to save valuable time, especially on busy weeknights! You can make the sushi rice and seafood mixture up to 24 hours in advance. Simply cook and season the rice as instructed, then refrigerate it in an airtight container. For the seafood mix, combine the flaked salmon, imitation crab, and Sriracha mayo, and store it separately in the fridge. When you’re ready to bake, simply layer the cold rice and seafood mixture in your baking dish and bake for 10-15 minutes at 400°F until heated through and golden on top. This method ensures your dish remains just as delicious while trimming down prep time!
How to Store and Freeze Salmon Sushi Bake
Fridge: Store leftovers in an airtight container for up to 3 days. This helps maintain the flavors while keeping everything fresh.
Freezer: You can freeze the Salmon Sushi Bake before baking by covering it tightly with plastic wrap or aluminum foil. It will last in the freezer for up to 2 months.
Reheating: To enjoy your stored bake, reheat in the oven at 350°F for 10-15 minutes until warmed through. For quicker reheating, microwave individual portions for 2-3 minutes.
Cooling Before Storing: Always allow the dish to cool to room temperature before sealing it in containers, as this prevents moisture buildup that can affect texture.
Expert Tips for Salmon Sushi Bake
-
Use Short-Grain Rice: Ensure you use short-grain sushi rice for the best texture; it holds together perfectly and provides that signature stickiness.
-
Avoid Over-Baking: Watch your Salmon Sushi Bake closely toward the end to prevent it from becoming too crispy; aim for a golden top without darkening.
-
Customize Proteins: Feel free to tailor the protein to your taste—tuna or shrimp works wonders, making this dish versatile and adaptable for everyone.
-
Mix Ingredients Thoroughly: Ensure the Sriracha mayo is evenly combined with the seafood; this guarantees a flavorful bite in every scoop.
-
Finishing Toppings: Don’t skip the furikake and green onions—they add flavor and visual appeal to elevate your baked dish into something special.
What to Serve with Easy Deconstructed Salmon Sushi Bake
Nothing elevates a cozy family dinner like the delightful flavors and textures of this deconstructed sushi dish.
-
Sliced Cucumbers: Crisp and refreshing, they add a pleasant crunch that balances the richness of the bake.
-
Seaweed Snacks: These salty bites enhance the sushi experience and provide a satisfying texture contrast.
-
Miso Soup: A warm bowl of miso soup rounds out the meal with umami depth, making it a comforting combination.
-
Chilled Edamame: Lightly salted edamame offers a mildly nutty flavor, perfect for snacking alongside the main dish.
-
Mango Salad: A vibrant salad with fresh mango adds sweetness and a tropical twist that brightens your palate.
-
Japanese Pickles: Takuan or pickled ginger provides a tangy bite, cleansing the palate between rich bites of the bake.
-
Sparkling Sake: Pairing with a light, sparkling sake enhances the meal’s flavor profile, creating an elevated dining experience.
-
Green Tea Ice Cream: For dessert, the creaminess and hint of bitterness in green tea ice cream offers a perfect sweet finish.

Salmon Sushi Bake Recipe FAQs
How should I select the sushi rice for this dish?
Absolutely! When making your Salmon Sushi Bake, look for short-grain sushi rice specifically. This type of rice releases more starch, making it stickier and ideal for holding together your bake. Rinse it under cold water to remove excess starch before cooking, ensuring that it achieves that perfect texture.
What’s the best way to store leftovers?
To keep your Salmon Sushi Bake fresh, store any leftovers in an airtight container in the refrigerator for up to 3 days. Make sure to let the dish cool to room temperature before sealing it, as this helps prevent moisture buildup that can change its texture. When ready to enjoy again, simply reheat in the oven at 350°F for 10-15 minutes, or microwave individual portions for 2-3 minutes.
Can I freeze the Salmon Sushi Bake?
Very! If you want to prepare your Salmon Sushi Bake ahead of time, you can freeze it before baking. Wrap it tightly in plastic wrap or aluminum foil to ensure no air gets in. This way, it will last for up to 2 months in the freezer. When you’re ready to bake, thaw it overnight in the fridge and then bake as instructed until it’s golden and bubbly.
What if my bake turns out too dry?
If you find your Salmon Sushi Bake is a tad dry after baking, don’t worry! It might be that it was baked a little too long, so it’s important to keep an eye on it, especially in the last minutes. You can add a drizzle of extra Sriracha mayo or sprinkle some additional green onions and sesame seeds on top right before serving to reintroduce moisture and freshness.
Are there any dietary restrictions I should consider?
Absolutely! When preparing this dish, consider your guests’ dietary restrictions. If you’re serving individuals with seafood allergies, you can easily substitute the seafood with veggies or cooked chicken for a wholesome alternative. Additionally, if you’re mindful of diets, Sriracha mayo can be replaced with a lower-calorie or dairy-free mayo to accommodate different needs. Always check with your guests beforehand to ensure everyone gets to enjoy this delightful dish!
How can I make the dish spicier?
The more the merrier! If you love a kick, you can mix in diced jalapeños or a dash of chili oil into your seafood mixture before baking. This will elevate the spice levels without overpowering the dish. Pair it with extra Sriracha mayo drizzled on top for those who enjoy an added heat boost!

Savory Salmon Sushi Bake: A Cozy Family Feast
Ingredients
Equipment
Method
- Begin by rinsing sushi rice under cold water until clear. Cook according to package instructions, let it steam covered for 10 minutes.
- Combine rice vinegar, sugar, and salt in a microwave-safe bowl, microwave until sugar dissolves, then fold into the warm sushi rice.
- Preheat oven to 375°F. Season salmon, bake for 15-17 minutes, flake into bite-sized pieces.
- In a bowl, combine flaked salmon and imitation crab, gently mix to form a seafood base.
- Stir in Sriracha mayo into the seafood mixture until well combined.
- Preheat oven to 400°F. Grease a baking dish, press sushi rice to form a base, sprinkle furikake over the rice, layer the seafood mix on top.
- Bake for 10-15 minutes until top is golden and bubbly.
- Allow to cool, drizzle extra Sriracha mayo, sprinkle with furikake, sesame seeds, and green onions before serving.
- Serve warm, optionally with seaweed snacks.
Leave a Reply