
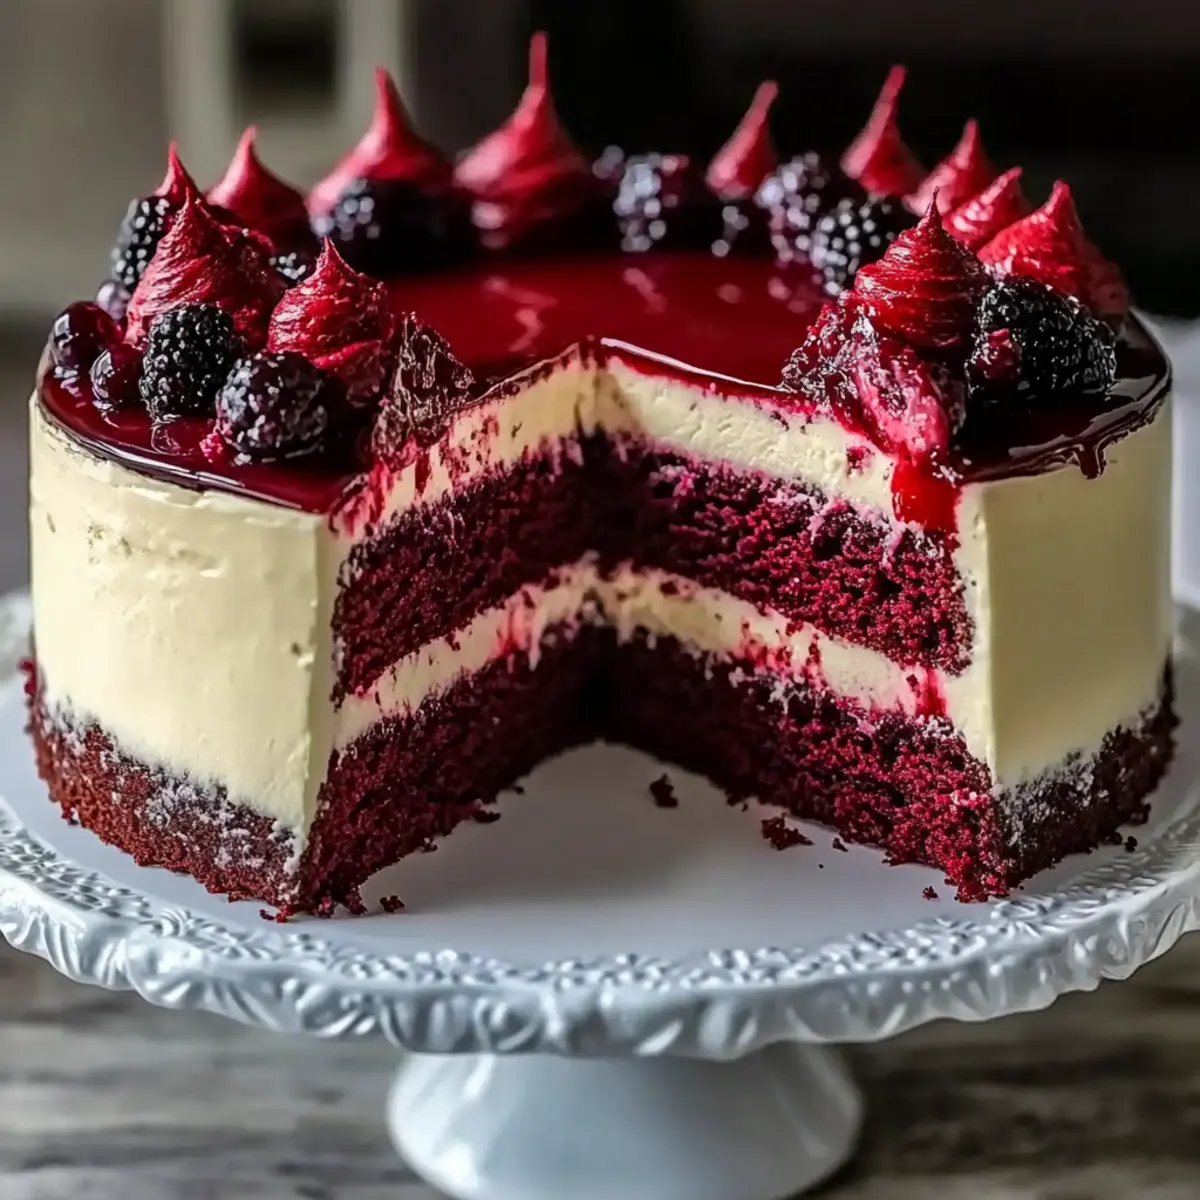
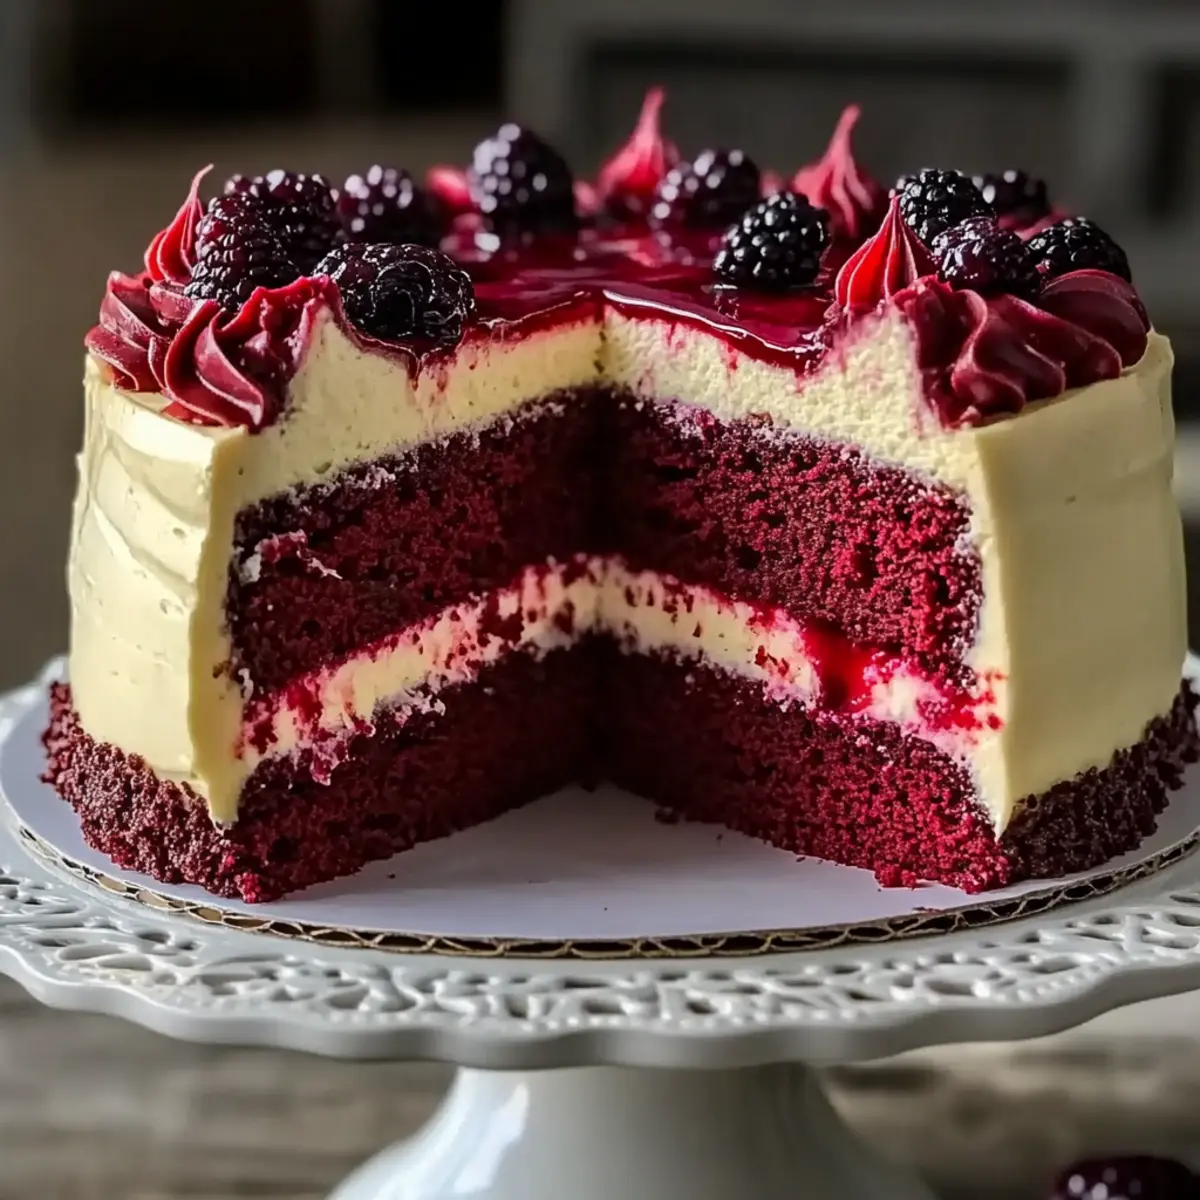
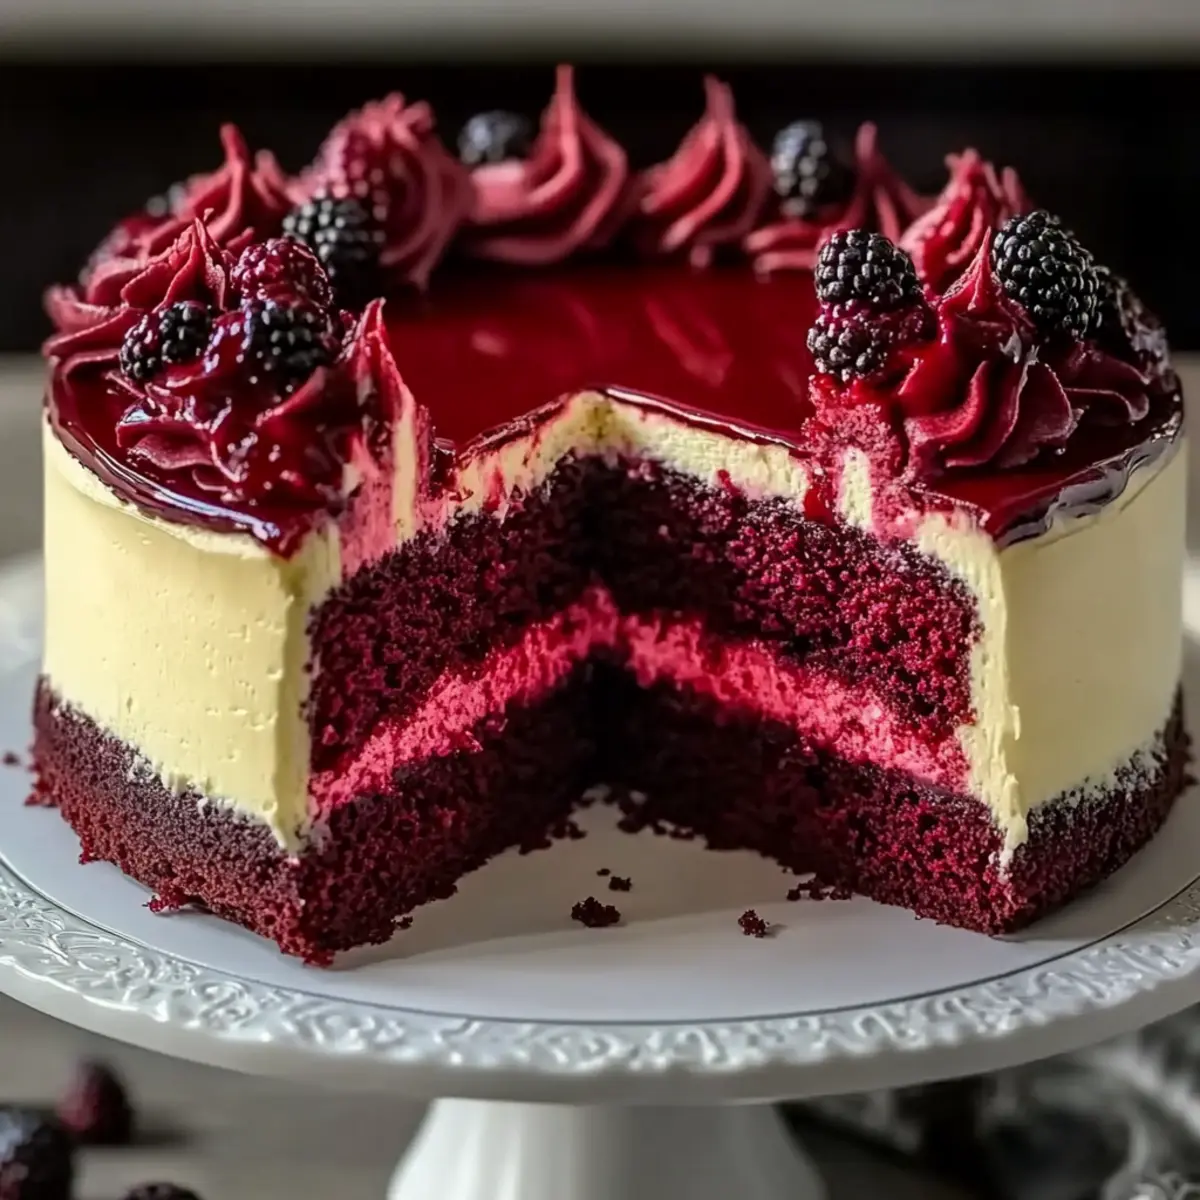
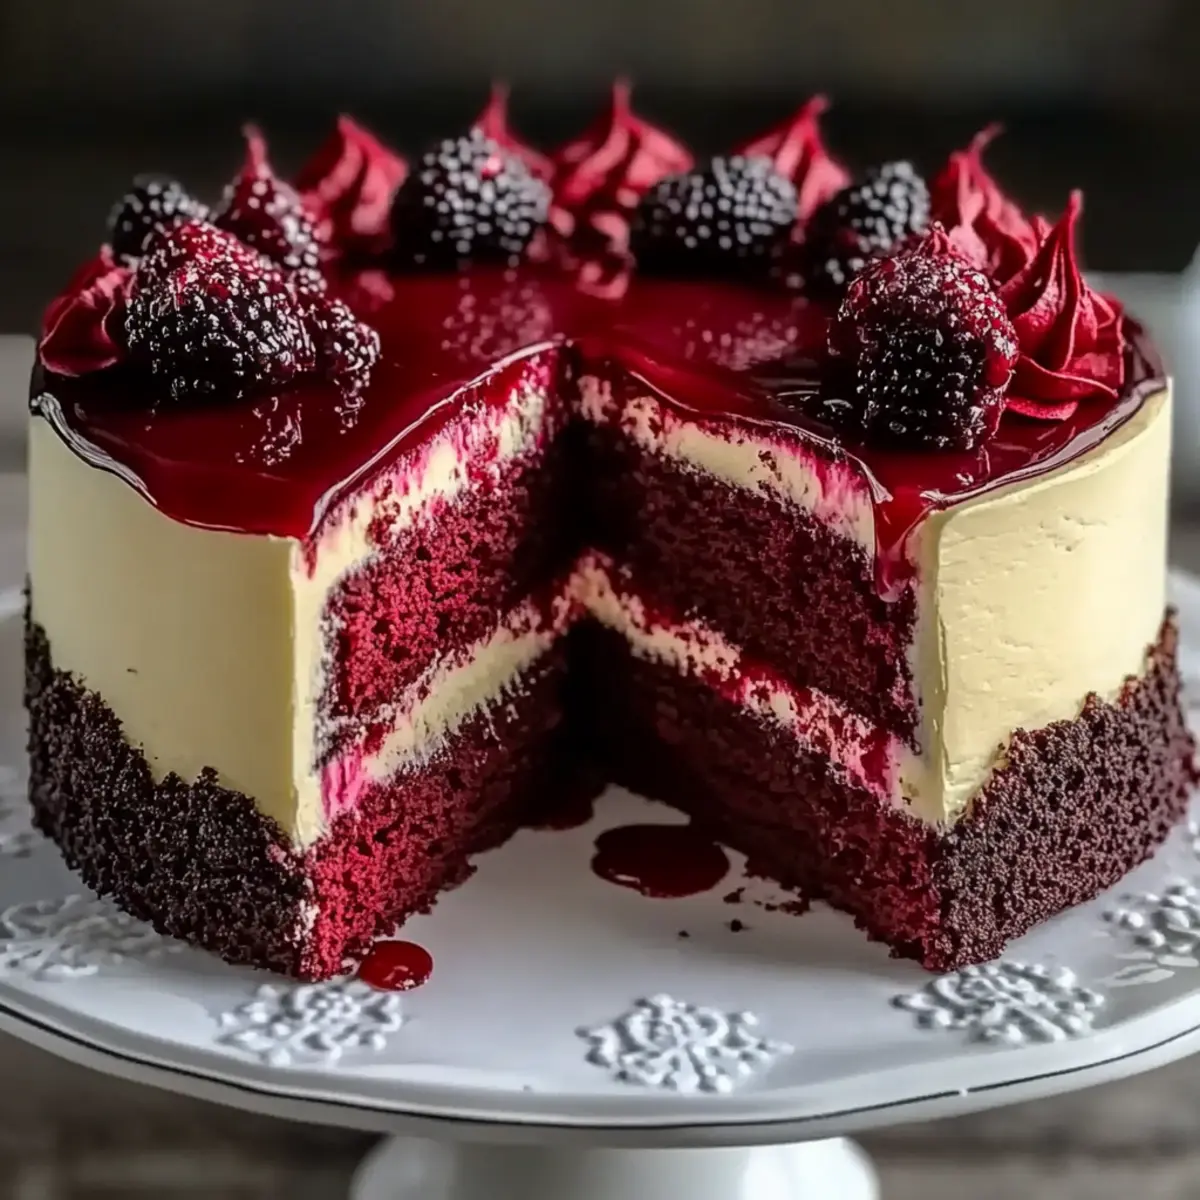
The first bite is a stunning revelation, where soft, velvety layers of red velvet cake embrace a luscious cheesecake core. Crafted with love, this Red Velvet Cheesecake Layer Cake Recipe combines the traditional flavors we adore with a smooth, creamy twist that elevates any occasion. Not only is it a showstopper at gatherings, but its surprisingly simple preparation means you won’t be chained to the kitchen for hours. Plus, with the option to add a glossy berry glaze, each slice becomes an irresistible treat, perfect for celebrations or a cozy night in. Are you ready to impress your friends and loved ones with this delightful confection? Let’s dive in!
Why is this cake your new favorite?
Decadent Delight: This Red Velvet Cheesecake Layer Cake offers a mesmerizing blend of rich red velvet and creamy cheesecake, ensuring each bite is pure enjoyment.
Effortless Elegance: Don’t let the impressive layers fool you! The straightforward preparation will have you feeling like a pro without spending hours in the kitchen.
Versatile Treat: Dress it up with a vibrant berry glaze or enjoy it simply frosted—whatever your mood, this cake adapts perfectly!
Perfect for Any Occasion: Whether it’s a birthday party or a cozy dinner, this cake will surely wow your guests and spark conversations.
A Dessert to Remember: Impress your friends with this stunning creation! For those craving more delightful twists, check out my Fried Strawberry Cheesecake or Brownie Cheesecake Bars.
Red Velvet Cheesecake Layer Cake Ingredients
For the Crust
- Chocolate Cookie Crumbs – Provides a crunchy texture for the crust; use graham cracker crumbs as a substitute if necessary.
- Unsalted Butter – Binds crumbs together in the crust; margarine can be used if preferred.
For the Red Velvet Cake
- All-Purpose Flour – Forms the structure of the cake; a gluten-free flour blend is perfect for a gluten-free version.
- Unsweetened Cocoa Powder – Adds rich chocolate flavor and deep color; omit for a non-chocolate version.
- Baking Soda – Helps the cake rise; no substitutes necessary.
- Baking Powder – Provides additional leavening; no substitutes necessary.
- Salt – Enhances flavor; sea salt can give a different taste.
- Granulated Sugar – Sweetens the cake and cheesecake layers; brown sugar can add more depth.
- Vegetable Oil – Keeps the cake moist; melted coconut oil is a great alternative.
- Eggs – Binds ingredients in both cake and cheesecake layers; flax eggs are a vegan substitute.
- Buttermilk – Adds moisture and tanginess; a milk-vinegar mixture works as a substitute.
- White Vinegar – Reacts with baking soda for proper rise; can be omitted if using buttermilk.
- Vanilla Extract – Imparts rich flavor; no substitutes necessary.
- Red Gel Food Coloring – Ensures vibrant red color; avoid replacing it with liquid food coloring.
For the Cheesecake Layer
- Cream Cheese – The core ingredient in the cheesecake layer; provides creaminess; Neufchâtel can be used for a lighter option.
- Granulated Sugar (for cheesecake) – Sweetens the layer; brown sugar can alternatively be used.
- Sour Cream – Contributes to the creamy texture; Greek yogurt makes a good substitute.
For the Frosting
- Heavy Cream – Adds richness to the frosting; whipped topping can work instead.
- Cream Cheese (for frosting) – Essential for traditional cream cheese frosting; substitute with vegan cream cheese if desired.
- Powdered Sugar – Sweetens and thickens frosting; consider using a sugar-free option.
For the Glaze
- Water – Used for thinning berry glaze; no substitutes necessary.
- Lemon Juice – Brightens and enhances the glaze’s flavor; lime juice also works well.
- Fresh Berries – Garnish for adding freshness and a beautiful appeal to your cake.
Dive into your kitchen and whip up this glorious Red Velvet Cheesecake Layer Cake, the perfect centerpiece for any celebration!
Step‑by‑Step Instructions for Red Velvet Cheesecake Layer Cake Recipe
Step 1: Prepare Cookie Crust
In a mixing bowl, combine chocolate cookie crumbs with melted butter until well mixed. Press the mixture evenly into the bottom of a greased 9-inch springform pan. Bake at 350°F (175°C) for 10 minutes, then remove from oven and let it cool fully. This crunchy base will beautifully contrast with the creamy cheesecake layer.
Step 2: Make Red Velvet Cake Batter
In a large bowl, whisk together the all-purpose flour, cocoa powder, baking soda, baking powder, and salt until combined. In a separate bowl, mix granulated sugar, vegetable oil, eggs, buttermilk, vinegar, vanilla extract, and red gel food coloring until smooth. Gradually fold the wet ingredients into the dry until just combined, ensuring a rich red velvet batter awaits you.
Step 3: Bake Red Velvet Cakes
Divide the prepared red velvet cake batter evenly between two greased and lined 9-inch round cake pans. Bake in the preheated oven at 350°F (175°C) for 25-30 minutes, or until a toothpick inserted into the center comes out clean. Once baked, allow the cakes to cool completely in the pans, letting the flavors settle perfectly.
Step 4: Prepare Cheesecake Layer
In a mixing bowl, beat the cream cheese and granulated sugar together until the mixture is smooth and creamy. Gradually add in the eggs, vanilla extract, and sour cream one at a time, mixing thoroughly between each addition. The cheesecake batter should be velvety; pour it over the cooled cookie crust and bake at 325°F (160°C) for 40-45 minutes until it’s slightly jiggly in the center.
Step 5: Cool and Refrigerate Cheesecake
Once the cheesecake layer is done baking, gently remove it from the oven and let it cool at room temperature for an hour. Then, refrigerate it for at least 4 hours or overnight to set completely, ensuring that it will slice beautifully when layered with the red velvet cakes.
Step 6: Assemble Cake Layers
On a serving plate, place one layer of the red velvet cake as your base. Spread a layer of cream cheese frosting on top to secure the cheesecake layer. Gently invert the cooled cheesecake onto the first red velvet layer, ensuring it’s center-aligned. Then, place the second red velvet layer on top to complete your glorious Red Velvet Cheesecake Layer Cake assembly.
Step 7: Frost the Cake
Using the remaining cream cheese frosting, generously frost the sides and top of the assembled cake. Aim for a smooth finish, with the frosting enveloping the alluring layers within. This simple yet delightful frosting adds to the visual appeal, making your cake irresistible.
Step 8: Glaze and Garnish
In a small saucepan, gently warm berry jam with a splash of water and lemon juice until it becomes pourable. Once ready, drizzle the warm berry glaze over the cake, allowing it to elegantly drip down the edges. Add fresh berries and optional chocolate chips on top for an exquisite finish to your Red Velvet Cheesecake Layer Cake.
Make Ahead Options
The Red Velvet Cheesecake Layer Cake is perfect for meal prep, allowing you to create a stunning dessert ahead of time! You can prepare the cookie crust and cheesecake layer up to 24 hours in advance, following the baking steps and then refrigerating them to maintain freshness. Store the cooled cheesecake in an airtight container and keep the crust wrapped to prevent any moisture loss. You can also bake the red velvet cake layers 3 days ahead; just ensure they are completely cooled and tightly wrapped in plastic wrap before refrigerating. When you’re ready to serve, simply assemble the layers with frosting and the berry glaze for a cake that’s just as delicious as when freshly crafted!
What to Serve with Decadent Red Velvet Cheesecake Layer Cake
As you revel in the delightful layers of this rich dessert, consider these perfect partners to create a memorable meal experience.
-
Creamy Mashed Potatoes: Their buttery richness complements the cake’s sweetness, providing a satisfying contrast that keeps guests coming back for more.
-
Fresh Garden Salad: A crisp salad with mixed greens, cucumbers, and a light vinaigrette can add a refreshing element to balance the cake’s decadence.
-
Vanilla Ice Cream: The creamy, cool texture of vanilla ice cream perfectly pairs with the warm, luscious cake, enhancing each bite with fun and contrast.
-
Chocolate-Covered Strawberries: These sweet morsels echo the cake’s flavors, creating a harmonious theme of indulgent sweetness suitable for any gathering.
-
Sparkling Fruit Punch: A festive drink option, its fruity notes and effervescence will bring brightness to your dessert table, harmonizing delightfully with the berry glaze.
-
Coffee or Espresso: The bold flavors of coffee cut through the cake’s richness while providing a warm, comforting end to your meal—a true treat for cafe lovers.
-
Cheesecake Bites: Provide variety by serving smaller cheesecake bites, giving guests a chance to enjoy another mini dessert alongside the impressive layer cake.
Choose a few of these delights to elevate your dessert experience, and give your loved ones a feast they will remember!
Red Velvet Cheesecake Layer Cake Variations
Feel free to let your creativity shine as you customize this show-stopping dessert according to your tastes!
- Dairy-Free: Substitute cream cheese with dairy-free cream cheese and use almond milk for the buttermilk.
- Chocolate Lovers: Add mini chocolate chips to the red velvet batter for delightful bursts of chocolate in every slice.
- Gluten-Free: Replace all-purpose flour with a gluten-free flour blend for a cake everyone can enjoy.
- Citrus Twist: Add zest from one orange or lemon to the cheesecake layer for a refreshing citrus flair.
- Flavor Infusion: Enhance the flavor with almond or coconut extract instead of vanilla for a unique twist.
- Premium Chocolate Ganache: Swap the berry glaze for a rich chocolate ganache made by melting dark chocolate with heavy cream.
- Nutty Crunch: Sprinkle crushed walnuts or pecans between cake layers for added texture and a nutty flavor.
- Red Velvet Cupcakes: Transform the cake recipe into cupcakes, reducing baking time to about 15-20 minutes for individual servings. Perfect for parties!
Explore these variations for an exciting twist! If you’re looking for more creative desserts, check out my Apple Crumble Cheesecake or Bake Nutella Cheesecake for delightful ideas that are sure to impress.
How to Store and Freeze Red Velvet Cheesecake Layer Cake
Fridge: Keep your cake in an airtight container in the refrigerator for up to 4-5 days. This will help maintain its moisture and flavor, making every slice just as delicious.
Freezer: For longer storage, freeze the cake by wrapping it tightly in plastic wrap followed by aluminum foil, and it will last for up to 3 months. Thaw in the fridge overnight before serving.
Reheating: If you desire a warm slice, gently heat individual portions in the microwave for 10-15 seconds. Avoid overheating, as it can affect the texture of the cheesecake layer.
Serving Tip: Always garnish with fresh berries or additional frosting right before serving to keep the presentation fresh! Enjoy your delightful Red Velvet Cheesecake Layer Cake!
Helpful Tricks for Red Velvet Cheesecake Layer Cake
Room Temperature Ingredients: Ensure that all dairy ingredients, especially cream cheese, are at room temperature for a smooth, lump-free batter.
Gentle Mixing: Avoid overmixing the cake batter to keep it light and fluffy. Mix only until ingredients are combined to prevent a tough texture in your Red Velvet Cheesecake Layer Cake.
Cooling Cheesecake: Let the cheesecake cool completely to room temperature before refrigerating. This prevents cracks and ensures a perfect slice when serving.
Assemble with Care: When stacking the layers, use cream cheese frosting as glue to hold them together. This helps maintain stability and keeps your cake from toppling.
Berry Glaze Tip: Warm the berry glaze slightly before pouring to achieve a beautiful drizzle effect down the sides of the cake. This adds both taste and visual appeal.
Red Velvet Cheesecake Layer Cake Recipe FAQs
What type of chocolate cookie crumbs should I use for the crust?
I recommend using chocolate cookie crumbs as they provide a delightful crunch. You can use store-bought chocolate cookie crumbs or crush your favorite chocolate cookies at home. If you’re looking for an alternative, graham cracker crumbs work in a pinch, although they will give a slightly different flavor and texture.
How should I store the Red Velvet Cheesecake Layer Cake?
Absolutely! To enjoy the best flavors and textures, store your cake in an airtight container in the refrigerator for about 4-5 days. This keeps it moist and fresh. For longer storage, you can wrap individual slices tightly in plastic wrap and then place them in a freezer-safe bag. They will last up to 3 months in the freezer.
Can I freeze the Red Velvet Cheesecake Layer Cake?
Yes, freezing is a great way to extend the life of your cake! First, wrap the entire cake or individual slices tightly in plastic wrap, then cover with aluminum foil to prevent freezer burn. When you’re ready to enjoy it, remove the cake from the freezer and let it thaw overnight in the fridge. This will ensure the texture remains lovely and creamy.
What should I do if my cheesecake layer cracks?
Don’t fret! If you notice cracks, it often happens due to temperature fluctuations or overbaking. To avoid cracks in the future, bake the cheesecake layer at a lower temperature (325°F or 160°C) and ensure you allow it to cool gradually before refrigerating. If cracks do appear, you can cover them with frosting or berries, which can add a very appealing touch!
Is this Red Velvet Cheesecake Layer Cake suitable for those with dietary restrictions?
Very! You can easily modify this recipe to cater to different dietary needs. This cake can be made vegetarian by using flax eggs as a substitute for traditional eggs to make it vegan. For gluten-free versions, swap the all-purpose flour with a gluten-free blend. Always check the specific ingredients to ensure they meet your dietary restrictions, especially if allergies are a concern.
How long does the berry glaze last, and can I make it ahead of time?
The berry glaze is quite simple to prepare and can be stored in the fridge for about 3 to 5 days in an airtight container. If you want to make it ahead of time, just warm it gently when you’re ready to use it again, adding a splash of water if it looks too thick!
Delicious Red Velvet Cheesecake Layer Cake Recipe to Indulge
Ingredients
Equipment
Method
- Prepare the cookie crust by mixing chocolate cookie crumbs with melted butter. Press into a greased springform pan and bake at 350°F (175°C) for 10 minutes. Let it cool.
- In a bowl, whisk together flour, cocoa powder, baking soda, baking powder, and salt. In another bowl, mix sugar, oil, eggs, buttermilk, vinegar, vanilla, and food coloring until smooth. Fold wet into dry ingredients.
- Divide batter into greased 9-inch round pans and bake at 350°F (175°C) for 25-30 minutes. Allow cakes to cool completely.
- Beat cream cheese with granulated sugar until smooth. Add eggs, vanilla, and sour cream, mixing thoroughly. Pour over cookie crust and bake at 325°F (160°C) for 40-45 minutes until slightly jiggly.
- Cool the cheesecake at room temperature for an hour and then refrigerate for at least 4 hours or overnight.
- Assemble the cake by placing one cake layer on a serving plate. Spread cream cheese frosting on top and add the cheesecake layer, then top with the second cake layer.
- Frost the assembled cake with remaining cream cheese frosting for a smooth finish.
- Warm berry jam with water and lemon juice. Drizzle over the cake and garnish with fresh berries and optional chocolate chips.
Leave a Reply