
The aroma of caramelized cookies drifts through the kitchen, instantly transporting me to a cozy café where I first discovered the delightful Biscoff flavor. Today, I’m excited to share my twist on a beloved classic with these No-Bake Biscoff Cheesecake Cups. They’re not only easy to prepare but also add that wow factor to any gathering, making them the perfect choice for busy days or spontaneous get-togethers with friends. With layers of buttery Biscoff cookie crust and fluffy, whipped cheesecake topped with creamy cookie butter, each cup offers a delightful balance of textures and flavors. You won’t believe how simple yet indulgent these desserts can be. Curious to see just how easy these little cups of joy are to whip up?

Why You’ll Love No-Bake Biscoff Cheesecake Cups
Irresistible Flavor: These cheesecake cups combine buttery Biscoff cookies with fluffy cream cheese, creating a rich taste that will leave you wanting more.
Quick to Prepare: The no-bake nature means minimal effort is required, perfect for whipping together on busy days.
Gorgeous Presentation: Each cup looks elegantly crafted, impressing guests and family alike without the fuss of traditional cheesecakes.
Versatile Delight: Feel free to experiment with toppings like fruit or melted chocolate to make these cups truly your own. For more inspiration, check out my delicious Biscoff Cookie Butter recipe!
Crowd-Pleaser: These individual servings make them a hit for anytime gatherings, securing your place as the dessert champion at any event.
No-Bake Biscoff Cheesecake Cups Ingredients
For the Crust
- Lotus Biscoff biscuits – The base for a crunchy crust; you can substitute with any spiced caramelized or graham cracker for a different flavor.
- Unsalted butter (2 tablespoons, melted) – Binds the cookie crumbs together for structure; make sure it’s melted for easy mixing.
For the Filling
- Heavy cream (16 oz / 2 cups) – Creates a light, airy texture in the filling; consider using whipped topping for a lighter version.
- Cream cheese (8 oz, at room temperature) – Essential for a creamy cheesecake filling; ensure it’s softened to avoid lumps.
- Powdered sugar (½ cup) – Sweetens the filling; you can replace it with granulated sugar, though the texture may be less smooth.
- Biscoff spread (½ cup + extra for topping) – Imparts the signature flavor and adds a glossy finish; try other nut butters for a unique twist.
- Vanilla extract (1 teaspoon) – Enhances overall flavor; optional but highly recommended.
For Garnish
- Halved Biscoff cookies and reserved cookie crumbs – Perfect for decoration and adds that touch of elegance to your no-bake Biscoff cheesecake cups.
Step‑by‑Step Instructions for No-Bake Biscoff Cheesecake Cups
Step 1: Prepare the crust
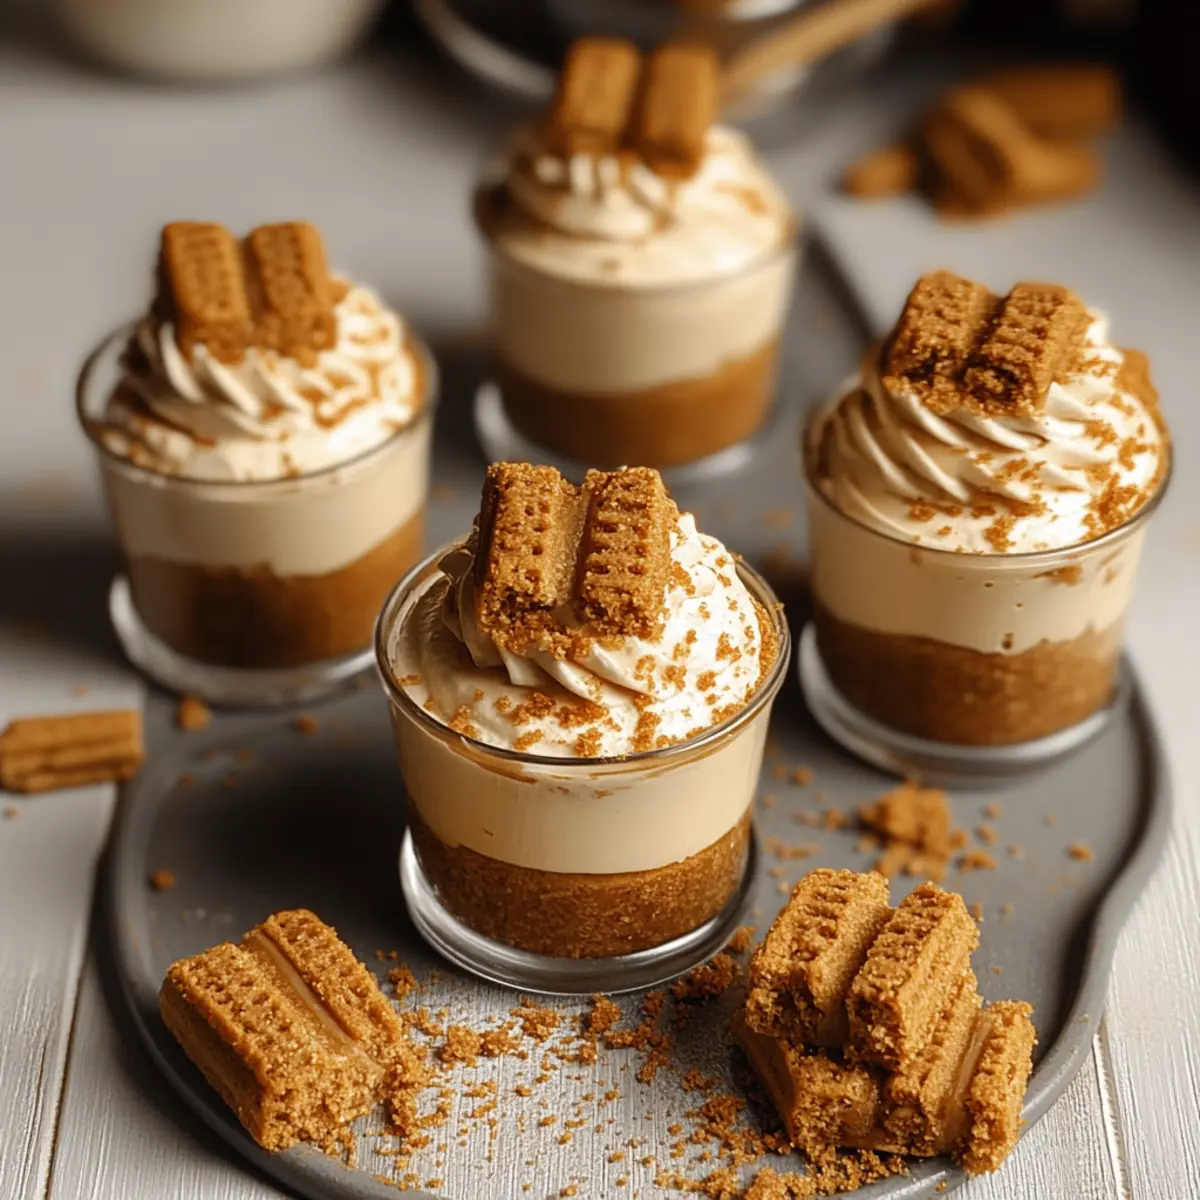
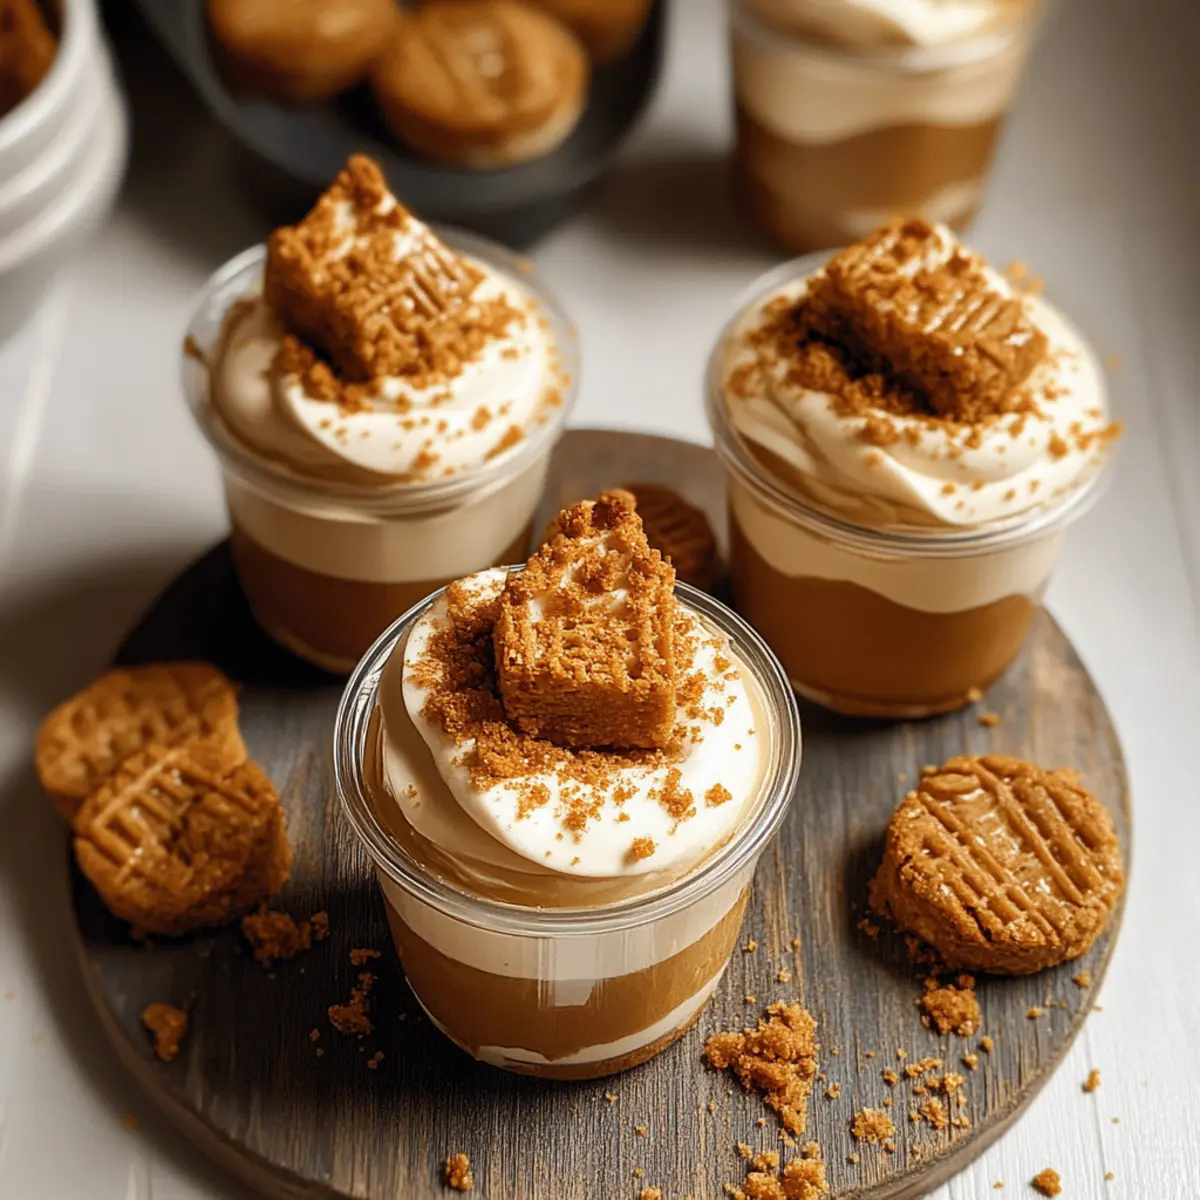
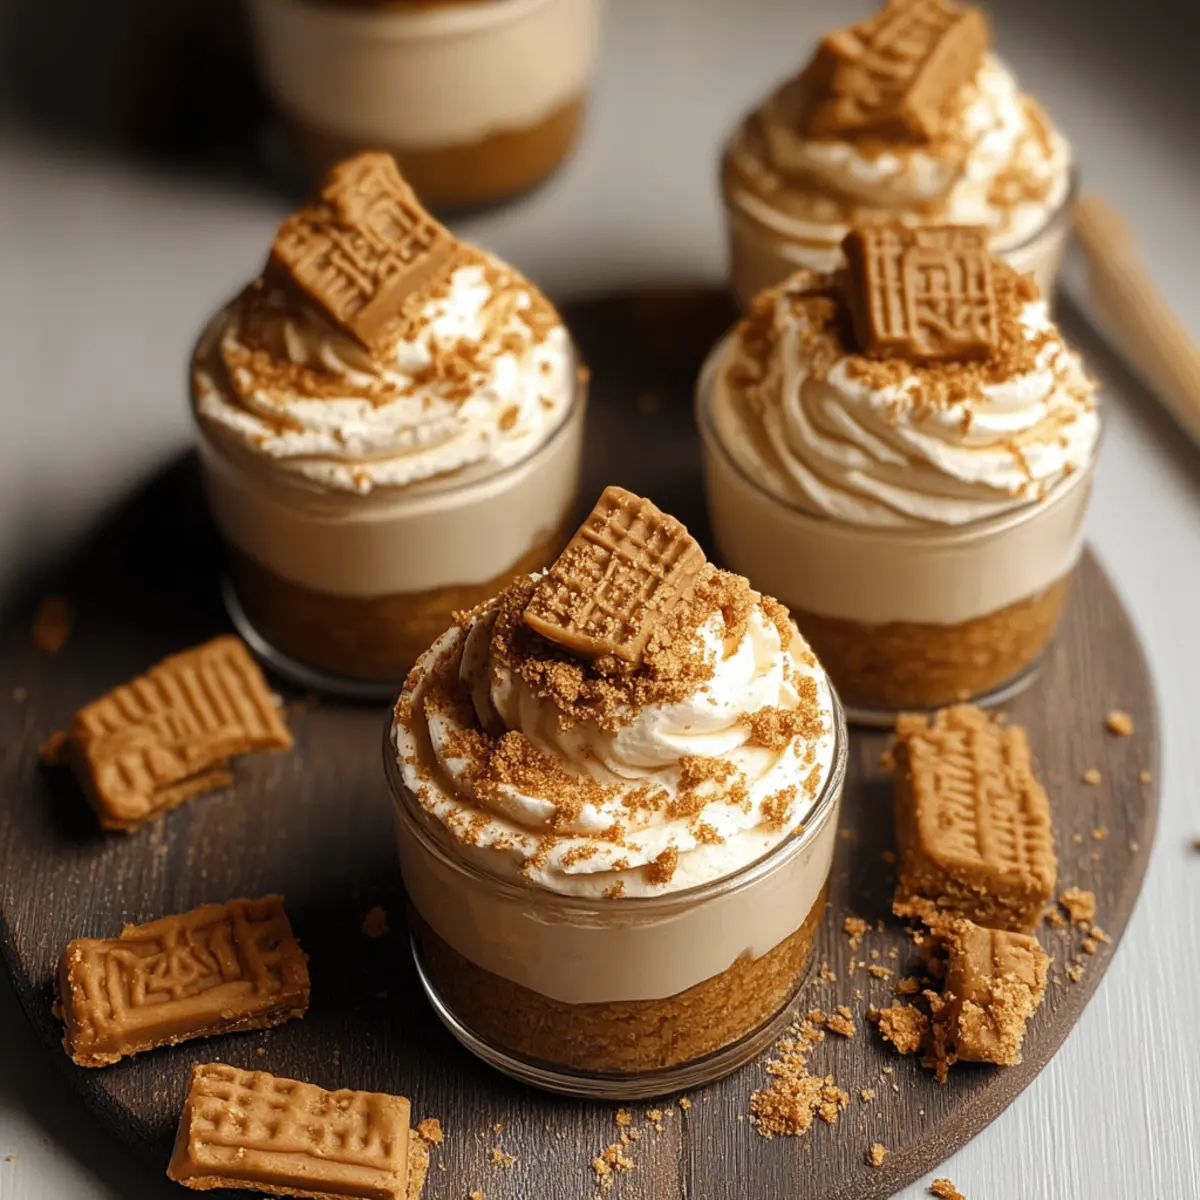
Start by crushing the Lotus Biscoff biscuits into fine crumbs, either in a food processor or by placing them in a zip-top bag and rolling with a rolling pin. In a bowl, mix the crushed cookies with melted unsalted butter until well combined. Once mixed, take the mixture and firmly press it into the bottom of each serving cup using the back of a spoon or a glass to create a sturdy crust.
Step 2: Whip the cream
In a large mixing bowl, pour in the heavy cream and use an electric mixer to whip on medium-high speed for about 3–4 minutes, or until stiff peaks form. The whipped cream should be light and fluffy, almost doubling in volume. Make sure to keep an eye on it, as over-whipping can turn it grainy.
Step 3: Mix the filling
In another bowl, beat the room-temperature cream cheese, powdered sugar, Biscoff spread, and vanilla extract together using an electric mixer on medium speed for 2–3 minutes until the mixture is smooth and creamy. Ensure there are no lumps, which is key for a silky filling. Gently fold in the whipped cream using a spatula until everything is well blended and airy, creating the creamy filling for your No-Bake Biscoff Cheesecake Cups.
Step 4: Pipe the filling
Transfer the cheesecake mixture into a piping bag for neat distribution. Pipe the creamy filling evenly into each cup over the prepared cookie crust, filling them about three-quarters full. Take your time to create a nice, even layer, and smooth the top with a spatula if needed. This step will enhance the presentation of your no-bake Biscoff cheesecake cups.
Step 5: Top with Biscoff spread
Melt the extra Biscoff spread in the microwave for about 15-20 seconds until it’s pourable. Carefully drizzle or spoon the melted Biscoff spread over the cheesecake filling in each cup, creating a luscious top layer. To add a touch of elegance, garnish with halved Biscoff cookies and a sprinkle of the reserved cookie crumbs, which adds visual appeal to your no-bake dessert.
Step 6: Chill
Cover the filled cups with plastic wrap and refrigerate them for at least 4 hours, or ideally overnight, to allow the layers to set properly. This chilling time ensures that your no-bake Biscoff cheesecake cups achieve the right texture—firm yet creamy, perfect for serving chilled at your next gathering. Remember, the longer they chill, the better the flavors meld together!
How to Store and Freeze No-Bake Biscoff Cheesecake Cups
Fridge: Store uncovered in the fridge for up to 3 days. This will keep the creaminess intact while maintaining their delightful flavors.
Freezer: For longer storage, freeze them for up to 2 months. Wrap tightly in plastic wrap and then foil to prevent freezer burn.
Thawing: To enjoy frozen cheesecake cups, transfer them to the fridge overnight to thaw gradually. Avoid microwaving, as this could alter their texture.
Serving: Serve chilled once thawed. If preferred, drizzle with extra Biscoff spread just before serving to freshen their appearance and flavor.
What to Serve with No-Bake Biscoff Cheesecake Cups
Creating a stunning dessert experience is so much easier when you know the perfect pairings to delight your guests.
-
Fresh Berries: The natural sweetness and tartness of berries cut through the richness of the cheesecake, adding a vibrant, juicy element to your dessert table.
-
Whipped Cream: A dollop of fluffy whipped cream enhances the creamy texture of the cheesecake cups while balancing the sweet flavors. It looks beautiful and tastes divine!
-
Chocolate Shavings: Rich and elegant, dark chocolate shavings lend an indulgent touch, enriching the overall flavor profile while adding a delightful crunch.
-
Espresso or Coffee: A warm cup of coffee or espresso pairs beautifully with the sweet, caramel notes of the Biscoff spread, creating a perfect end-of-meal pairing.
-
Mint Leaves: A garnish of fresh mint leaves not only adds a pop of color to your presentation but also a refreshing hint that brightens the dessert.
-
Caramel Sauce: A drizzle of homemade caramel sauce brings a luxurious touch and even more sweetness, enhancing the dessert experience.
-
Sparkling Water: For a refreshing drink option, sparkling water with a slice of lemon offers a light, crisp palate cleanser between bites.
-
Fruity Sorbet: A lemon or raspberry sorbet provides a refreshing contrast; its fruity, icy nature offers a delightful balance to the creamy cheesecake.
No-Bake Biscoff Cheesecake Cups Variations
Feel free to explore the delightful possibilities of these cheesecake cups, as each variation opens up a world of flavors and textures.
-
Nut-Free: Substitute Biscoff spread with sunflower seed butter for a similar taste without nuts, making it safe for schools and gatherings.
-
Gluten-Free: Use gluten-free cookies in place of Biscoff for a crumbled crust that everyone can enjoy.
-
Chocolate Lovers: Add cocoa powder to the cream cheese filling or drizzle melted chocolate on top for a rich chocolate experience. Indulge in even more chocolatey goodness with a slice of my Brownie Cheesecake Bars.
-
Fruity Burst: Layer a homemade berry compote or fresh fruit between the crust and filling to introduce a refreshing tartness that brightens the overall flavor.
-
Heavenly Coconut: Stir in shredded coconut into the filling for a tropical twist, then finish with a sprinkle of toasted coconut on top.
-
Pumpkin Spice: Add pumpkin puree and pumpkin spice to the filling for a comforting fall-inspired dessert. These flavors can be a lovely nod to classic autumnal treats.
-
Mini Jars: Serve in small mason jars instead of cups for a cute and rustic presentation, perfect for parties and picnics.
-
Dairy-Free: Opt for cream cheese made from cashews or use a dairy-free whipped topping to create a rich, decadent indulgence that fits a dairy-free lifestyle.
Embrace your creativity and tweak these No-Bake Biscoff Cheesecake Cups to suit your palate! Each combination is a delightful way to treat yourself and loved ones, and if you’re in the mood for something different, consider trying my easy-to-make Apple Crumble Cheesecake for another enjoyable dessert option.
Expert Tips for No-Bake Biscoff Cheesecake Cups
-
Room Temperature Cream Cheese: Ensure your cream cheese is at room temperature to avoid lumps. Cold cream cheese can lead to a grainy texture, ruining your filling.
-
Perfect Whipped Cream: Whip the heavy cream until stiff peaks form for a light, airy texture. Watch closely to prevent over-whipping, which can make it grainy.
-
Firm Crust Packing: Pack the crust tightly into the cups using the back of a spoon or glass. This creates a firm base that holds together when serving your cheesecake cups.
-
Neat Filling Application: Use a piping bag to fill the cups with the cheesecake mixture. This gives a professional look and allows for even distribution of the filling.
-
Chill for Best Results: Refrigerate your no-bake Biscoff cheesecake cups for at least 4 hours, or overnight for maximum flavor blending and the perfect texture.
Make Ahead Options
These No-Bake Biscoff Cheesecake Cups are perfect for meal prep enthusiasts looking to save time on busy days! You can prepare the crust and filling up to 24 hours in advance. First, assemble the crust in your cups and refrigerate. Then, whip up the cheesecake filling and store it in an airtight container, ensuring it’s well covered to maintain its fluffiness. When you’re ready to serve, simply pipe the cheesecake mixture into the prepared crusts, top them with melted Biscoff spread, and garnish as desired. This method not only saves you time but also ensures your dessert is just as delicious and well-set when it’s time to indulge!
No-Bake Biscoff Cheesecake Cups Recipe FAQs
How do I choose ripe ingredients for this recipe?
Absolutely! For the best results, ensure your cream cheese is at room temperature, making it easier to blend into a smooth filling. While you can use any Biscoff biscuits, selecting fresh ones without any dark spots or cracks is ideal for that perfect crust.
What is the best way to store these cheesecake cups?
Very! Keep your No-Bake Biscoff Cheesecake Cups uncovered in the refrigerator for up to 3 days. If you cover them, the creamy texture is likely to become overly moist. For longer storage, wrap each cup tightly in plastic wrap and freeze them for up to 2 months.
Can I freeze my cheesecake cups, and if so, how?
Of course! To freeze, wrap each cheesecake cup tightly in plastic wrap, then in foil to prevent freezer burn. This method preserves their creamy texture. Thaw them overnight in the refrigerator before serving to enjoy their delightful flavors at their best.
What should I do if my filling is lumpy?
No worries! If you find lumps in your filling, it’s likely due to cold cream cheese. To fix this, start with room-temperature cream cheese. If lumps remain after mixing, try blending the filling with an immersion blender until smooth—this technique can rescue your cheesecake cups!
Are there any dietary considerations I should be aware of?
Definitely! If you’re preparing these cups for a gathering, consider possible allergies to dairy or gluten from the Biscoff biscuits. For a gluten-free version, look for gluten-free cookies or homemade alternatives. Always ensure you inform guests of the ingredients used to accommodate dietary restrictions.
Can I prepare these cups in advance?
Absolutely! You can make the No-Bake Biscoff Cheesecake Cups up to 24 hours in advance. Just remember to store them covered in the fridge, allowing them time to chill and set perfectly before your event. This will help the flavors meld beautifully!
Delectable No-Bake Biscoff Cheesecake Cups
Ingredients
Equipment
Method
- Crush the Lotus Biscoff biscuits into fine crumbs and mix with melted unsalted butter. Press mixture into the bottom of each serving cup to create a crust.
- Whip the heavy cream in a mixing bowl until stiff peaks form, about 3-4 minutes.
- Beat cream cheese, powdered sugar, Biscoff spread, and vanilla extract together until smooth. Fold in the whipped cream until well blended.
- Transfer the filling to a piping bag and pipe it evenly into each cup over the crust.
- Melt the extra Biscoff spread and drizzle over the cheesecake filling. Garnish with halved Biscoff cookies and cookie crumbs.
- Cover with plastic wrap and refrigerate for at least 4 hours or overnight to set.
Leave a Reply