
I stumbled across a mouthwatering post about Chicken Katsu Musubi during my latest scroll, and I couldn’t resist the pull of a crispy chicken creation wrapped in savory nori. This delightful Japanese snack, with its warm, seasoned sushi rice and a twist on the classic Spam version, is perfect for a quick lunch or a fun snack. What’s even better? It’s super easy to whip up, making it a satisfying go-to for busy days and hungry bellies. Imagine taking that first bite of juicy chicken enveloped in soft rice and umami-rich nori—who wouldn’t be tempted? Want to learn how to create this delicious masterpiece at home? Let’s dive into this scrumptious recipe together!

Why is Chicken Katsu Musubi a Must-Try?
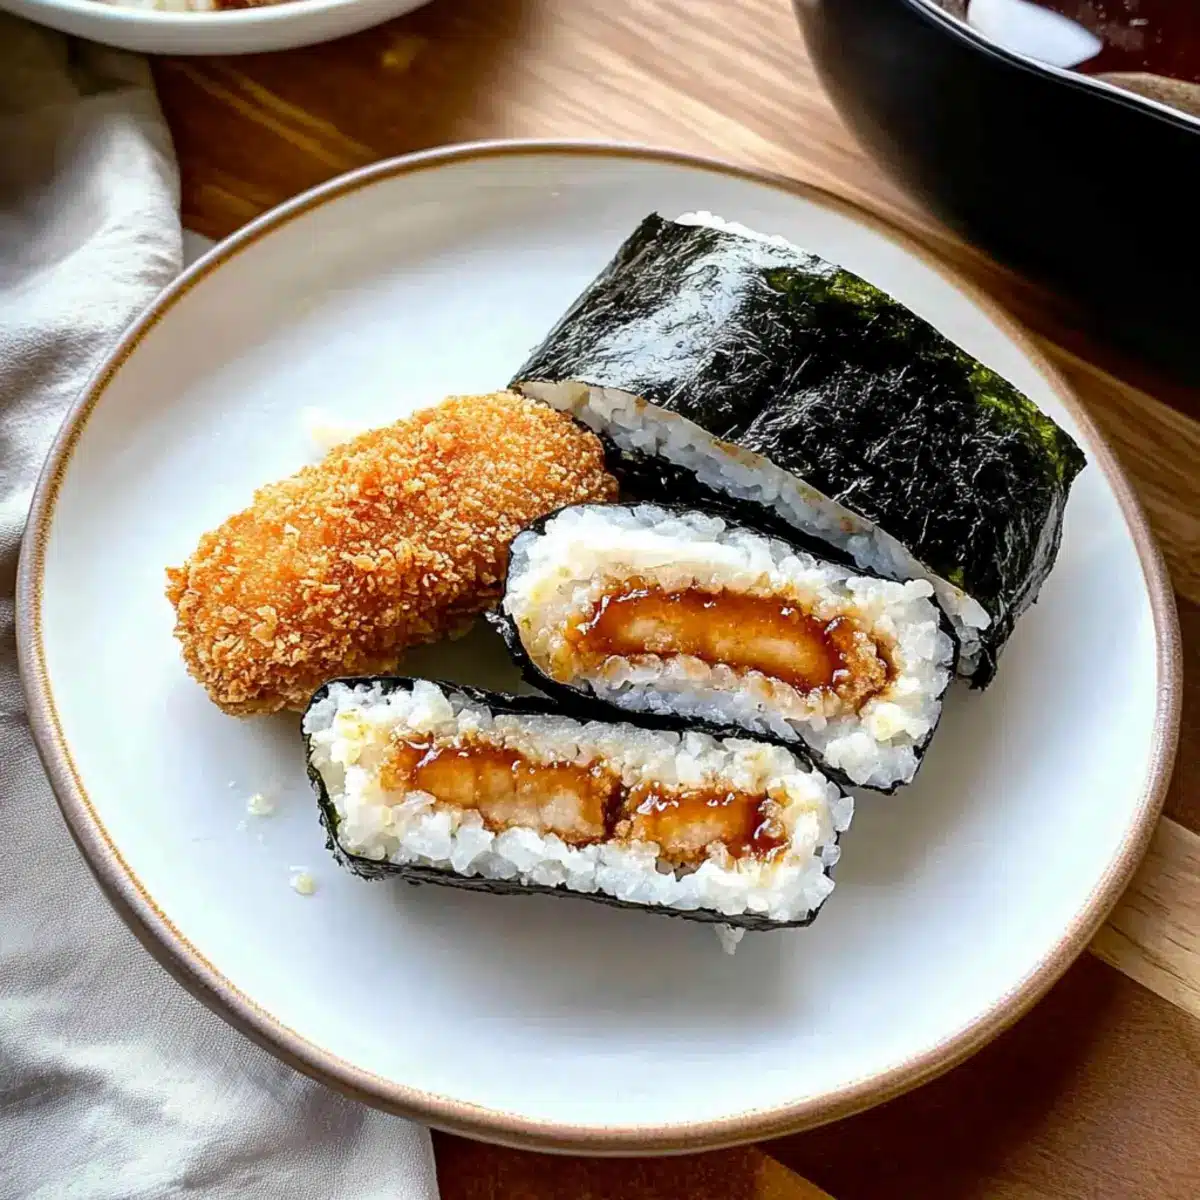
Crispy Perfection: The Chicken Katsu adds an irresistible crunch that contrasts beautifully with the soft sushi rice.
Savory and Satisfying: Each bite delivers a delicious umami punch, enhanced by the tonkatsu sauce.
Quick and Easy: Perfect for busy schedules, this recipe can be made in under 30 minutes.
Crowd-Pleasing Twist: Impress friends and family with this unique take on traditional musubi that everyone will love!
Versatile Options: Feel free to swap proteins or sauces, allowing for endless flavor combinations. Pair it with a refreshing side of pickled ginger for a complete experience!
Chicken Katsu Musubi Ingredients
For the Chicken
• Chicken Thighs – Boneless, skinless thighs provide juiciness and flavor; chicken breasts are a leaner alternative.
• Eggs – Binds the breadcrumbs for the katsu crust; replace with a flax egg for a vegan substitute.
• All-Purpose Flour – Helps create the wet batter; can be substituted with gluten-free flour for a gluten-free option.
• Salt & Black Pepper – Essential seasonings for flavoring the chicken; adjust to taste.
• Panko Breadcrumbs – Gives the signature crispy texture; opt for gluten-free panko if needed.
• Neutral Oil – Used for frying; vegetable, canola, or peanut oil are great choices.
For the Assembly
• Nori Sheets – Wraps the musubi and adds umami; consider soy paper if nori is unavailable.
• Cooked Sushi Rice – Seasoned rice acts as the base; adds flavor and stickiness essential for musubi.
• Tonkatsu Sauce – Adds richness and sweetness; for variation, substitute with soy sauce or homemade teriyaki sauce.
Now that we’ve gathered our ingredients, let’s get ready to craft this delicious Chicken Katsu Musubi! Your taste buds won’t want to miss this delightful twist on a classic favorite.
Step‑by‑Step Instructions for Chicken Katsu Musubi
Step 1: Prep Chicken
Start by flattening the boneless, skinless chicken thighs to an even thickness of about ½ inch. Use a meat mallet to gently pound the chicken, ensuring it cooks evenly. This step not only tenderizes the meat but also creates a perfect base for your Chicken Katsu Musubi’s crispy crust.
Step 2: Make Batter
In a shallow dish, whisk together eggs, all-purpose flour, and a pinch of salt and black pepper to create a wet batter. Aim for a smooth consistency that clings to the chicken without being too runny. This batter will help the panko breadcrumbs adhere during the coating process, adding that signature crispiness to your musubi.
Step 3: Coat Chicken
Take each piece of pounded chicken and first dredge it in the egg batter, ensuring it is completely covered. Next, coat the chicken in panko breadcrumbs, pressing gently to ensure an even layer. The layer of breadcrumbs is crucial for the delightful crunch of your Chicken Katsu Musubi.
Step 4: Fry Chicken
Heat a generous amount of neutral oil in a large pan over medium-high heat until it reaches 350°F. Carefully add the coated chicken and fry for about 4-6 minutes on each side, or until the chicken is golden brown and has reached an internal temperature of 165°F. Once cooked, transfer the chicken to a wire rack to cool while maintaining its crispiness.
Step 5: Assemble Musubi
To assemble your Chicken Katsu Musubi, place a strip of nori on a work surface. Using a musubi mold (or an empty Spam can), moisten it to prevent sticking. Pack in approximately ½ cup of cooked sushi rice, pressing down firmly to create a compact base for your musubi.
Step 6: Add Chicken
Once the rice is packed, drizzle a layer of tonkatsu sauce over the sushi rice. Carefully place a piece of the crispy chicken on top of the sauce, allowing the flavors to meld together. Wrap the nori around the rice and chicken, sealing the edges with a little water to secure your Chicken Katsu Musubi and keep it intact.
Step 7: Cut and Serve
Using a sharp knife, slice the assembled Chicken Katsu Musubi into bite-sized pieces if desired, ensuring a clean cut through the nori and warm rice. Serve immediately for the best texture, and enjoy this delightful Japanese-inspired snack burst with flavor and crunch that everyone will love!

Expert Tips for Chicken Katsu Musubi
-
Perfect Frying Temperature: Use a thermometer to ensure the oil reaches 350°F, achieving that golden crispness without oily sogginess.
-
Moisten for Success: Regularly moisten your musubi mold and nori to prevent sticking—this simple step makes assembling easier and neater.
-
Cooling Technique: Let the fried chicken cool on a wire rack instead of paper towels to keep that delicious crunch intact for your Chicken Katsu Musubi.
-
Season the Rice: Elevate flavor by seasoning sushi rice with rice vinegar, sugar, and salt before assembly for an authentic Japanese taste.
-
Adjust Serving Size: Feel free to vary the ratio of rice to chicken for a heartier or lighter musubi, catering to your preferences and those of your guests.
Make Ahead Options
These Chicken Katsu Musubi are perfect for meal prep enthusiasts! You can fry the chicken and assemble the musubi up to 24 hours in advance, allowing you to savor that delightful flavor all week long. To maintain quality, refrigerate the assembled musubi in an airtight container, and I recommend wrapping them tightly in plastic wrap to prevent the nori from becoming soggy. When ready to serve, simply slice the musubi and enjoy them cold or pop them in the microwave for about 10-15 seconds to warm slightly without losing that crispy texture. This way, you’ll have a quick and tasty snack whenever hunger strikes!
Storage Tips for Chicken Katsu Musubi
Fridge: Keep assembled Chicken Katsu Musubi in an airtight container in the refrigerator for up to 3 hours to maintain freshness and crispiness.
Freezer: For longer storage, freeze individual musubi wrapped tightly in plastic wrap and then in a freezer bag. They can stay fresh for up to 1 month.
Reheating: To reheat, thaw in the fridge overnight, then crisp in a hot pan for 2-3 minutes on each side until warmed through and the chicken regains its crunch.
Best Enjoyed Fresh: For the ultimate experience, enjoy Chicken Katsu Musubi shortly after assembling to appreciate the delightful contrasts in texture and flavor.
Chicken Katsu Musubi Variations
Feel free to get creative with your Chicken Katsu Musubi! Each variation adds a unique twist that will delight your taste buds.
-
Protein Swap: Try using pork or shrimp instead of chicken for a different flavor experience. Alternatively, opt for tempura vegetables to make a vegetarian version that’s equally satisfying.
-
Sauce Adventures: Switch things up by drizzling spicy mayo or hoisin sauce on your musubi. These sauces can elevate the taste profile, making each bite a delicious surprise.
-
Spicy Twist: Add a dash of sriracha or chili flakes to the tonkatsu sauce for a little heat. This adds an exciting kick that spice lovers will adore.
-
Rice Alternatives: Consider using brown rice for a heartier texture or quinoa for a protein boost. Both options bring a lovely nutty flavor that complements the chicken.
-
Herb Infusion: Incorporate finely chopped green onions or cilantro into the sushi rice for a fresh touch. The herbs will add brightness and an aromatic quality to your musubi.
-
Sweet Surprise: Mix in mango slices or pineapple chunks for a tropical twist. This unexpected addition creates a sweet contrast to the savory flavors of the chicken.
-
Texture Play: Instead of nori, try soy paper for a milder taste, or use crispy wonton wrappers for a fun, crunchy alternative.
-
Multi-layered Delight: Feel free to layer your musubi with pickled vegetables or kimchi for an extra depth of flavor. This adds a delightful zing that complements the dish perfectly.
Explore these variations, and turn your Chicken Katsu Musubi into a celebration of flavors that reflect your own culinary style. If you need more ideas, try pairing it with some Chicken Teriyaki Noodles for a complete meal or enjoy it alongside One Pan Chicken for a delightful culinary journey!
What to Serve with Chicken Katsu Musubi?
Elevate your Chicken Katsu Musubi experience with delightful pairings that complement its flavors and textures.
-
Pickled Ginger:
This zesty accompaniment cuts through the richness of the katsu, offering a refreshing bite. It’s a classic fusion that enhances the overall enjoyment of your musubi. -
Edamame:
Lightly salted and perfectly tender, edamame provides a delightful contrast to the crispy chicken. Their subtle nuttiness balances the bold flavors, making them an ideal side for your meal. -
Seaweed Salad:
A tangy seaweed salad adds an exciting pop of color and texture to your plate. The refreshing notes pair wonderfully with the umami of the katsu, creating a harmonious dining experience. -
Miso Soup:
Warm and comforting, a bowl of miso soup is the perfect companion to your musubi. Its light broth with hints of seaweed ties into the Japanese theme while soothing the palate. -
Cucumber Salad:
A cool cucumber salad drizzled with rice vinegar and sesame oil adds a crisp, refreshing element. The crunchy texture contrasts beautifully with the warm musubi. -
Hot Sauce:
For those who love a little heat, a drizzle of hot sauce brings an exciting kick to every bite. The spice enhances the savory notes of the katsu, making it an adventurous pairing. -
Sake or Japanese Beer:
Enhance your meal with a chilled glass of sake or a light Japanese beer. Both pair beautifully with the flavors of Chicken Katsu Musubi and elevate your dining experience.
Each of these sides enriches the Chicken Katsu Musubi experience, making your meal not just an average snack but a delicious culinary journey!

Chicken Katsu Musubi Recipe FAQs
What is the best type of chicken to use for Chicken Katsu Musubi?
Absolutely! Boneless, skinless chicken thighs are the best choice as they provide juiciness and flavor with minimal effort. However, if you’re looking for a leaner option, chicken breasts work well too. Just be cautious not to overcook them, as they can dry out.
How should I store leftover Chicken Katsu Musubi?
To keep your assembled Chicken Katsu Musubi fresh, store it in an airtight container in the fridge for up to 3 hours. This timing ensures that the crispiness of the chicken remains intact. When you’re ready to enjoy it, simply take it out and eat or reheat for a quick snack!
Can I freeze Chicken Katsu Musubi?
Yes! For longer storage, wrap each individual musubi tightly in plastic wrap, then place them in a freezer bag. They can be safely frozen for up to 1 month. To reheat, thaw them overnight in the fridge, then crisp them up in a hot pan for 2-3 minutes on each side to regain that delicious crunch.
What if my chicken is not crisping up while frying?
Very good question! Ensure that your oil is heated to the right temperature (350°F). An underheated oil won’t allow your chicken to crisp properly. If the oil is too cold, it will absorb more moisture and become soggy. Use a thermometer for accuracy, and don’t overcrowd the pan—this can lower the oil temperature significantly.
Are there any dietary considerations I should keep in mind?
Definitely! If you have gluten allergies, opt for gluten-free panko and flour. For those looking for a vegan version, a flax egg can replace the regular egg used for binding. Also, if you’re concerned about pets consuming any leftovers, keep in mind not to share musubi with dogs and cats as the seasoning might not be suitable for their diets.
How can I tell if my sushi rice is seasoned properly?
Excellent question! For the perfect sushi rice, you should feel a slight stickiness to hold everything together. After cooking, mix in a blend of rice vinegar, sugar, and salt while the rice is still warm, adjusting to your taste. A well-seasoned rice should be flavorful, slightly tangy, and sweet, complementing the savory nature of the katsu.
Crispy Chicken Katsu Musubi: A Delicious Twist on Tradition
Ingredients
Equipment
Method
- Start by flattening the chicken thighs to an even thickness of about ½ inch.
- In a shallow dish, whisk together eggs, flour, salt, and pepper to create a wet batter.
- Dredge the chicken in the egg batter and then coat with panko breadcrumbs.
- Heat oil in a pan and fry coated chicken for 4-6 minutes on each side until golden brown.
- Place nori on a work surface, moisten a mold, and pack in the sushi rice.
- Drizzle tonkatsu sauce over the rice and place the fried chicken on top.
- Wrap the nori around the rice and chicken, sealing the edges with water.
- Slice the assembled musubi into bite-sized pieces and serve immediately.
Leave a Reply